What are aperture, shutter speed, and ISO, and how do they work together to create a well-exposed photo?
Quick answer: Aperture, shutter speed, and ISO are the three camera settings that together control how much light reaches your sensor, a relationship called the exposure triangle. Aperture sets the size of the lens opening (affecting depth of field), shutter speed sets how long the sensor is exposed (affecting motion), and ISO sets how much the captured signal is amplified (affecting brightness and noise). Balancing all three lets you nail exposure while achieving your creative intent.
Learn how aperture, shutter speed, and ISO work together in the exposure triangle. Covers hands-on exercises, a scenario cheat sheet, modern mirrorless tools, and cross-brand camera tips.
Key Takeaways
- The exposure triangle (aperture, shutter speed, ISO) controls every aspect of a photo's brightness.
- Aperture (f-number) also controls depth of field; a smaller f-number means a wider opening and blurrier background.
- Shutter speed freezes or blurs motion; use 1/500s or faster to stop most action.
- ISO amplifies the sensor signal after capture, so higher ISO brightens the image but adds noise.
- Changing one setting requires compensating with another to maintain the same overall exposure.
- Use a histogram or live exposure preview (on mirrorless cameras) to confirm correct exposure before you press the shutter.
- A safe starting order for beginners: set ISO for the light level, choose aperture for your creative goal, then dial in shutter speed.
Here's the reality: most beginner photography guides make the exposure triangle sound harder than it is. I've taught this stuff to second shooters on wedding days, to friends who bought a Sony a6400 and never took it off Auto, and to my own kid. The concept is simple once you stop reading and start shooting. This guide is built around that idea. I'll explain each setting, then walk you through three hands-on exercises you can do this afternoon, then hand you a scenario cheat sheet you can tape to the back of your camera bag.
What Is the Exposure Triangle?
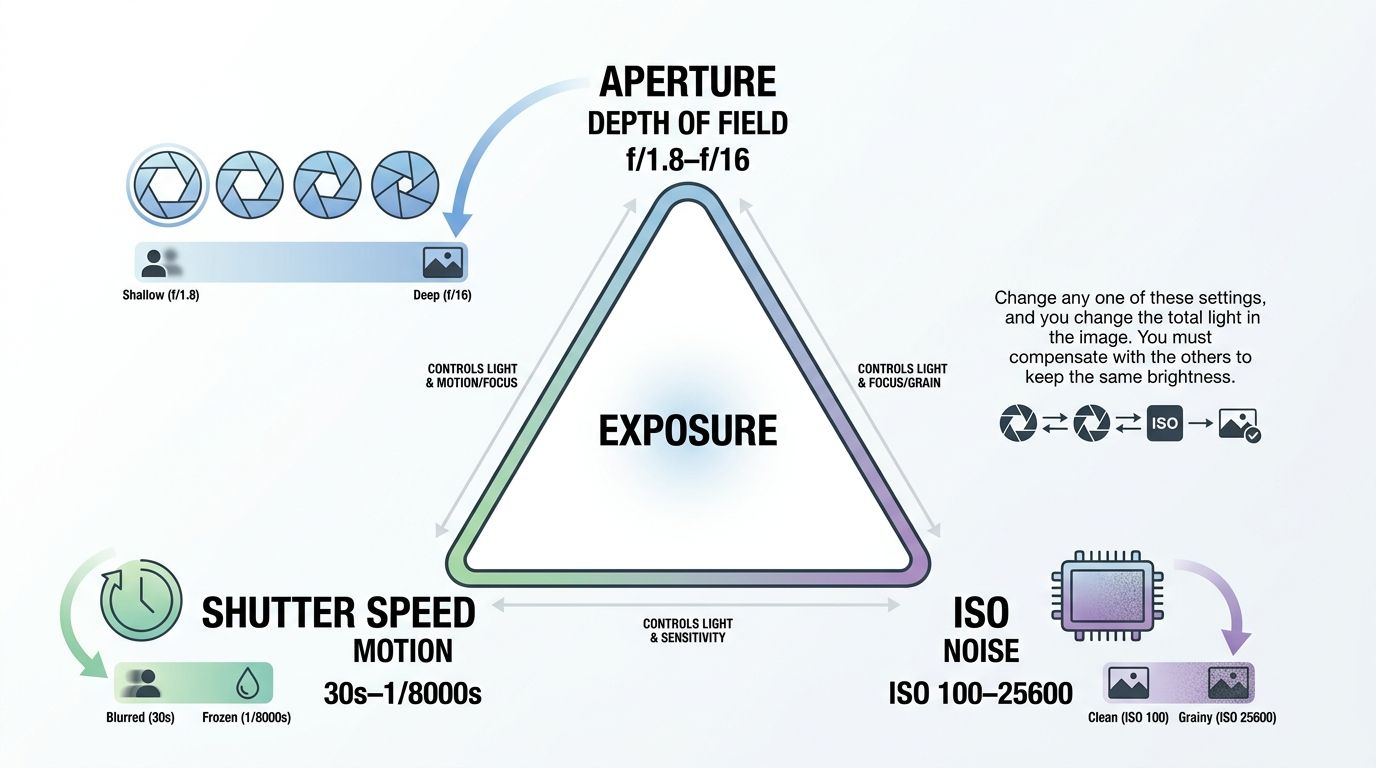
The exposure triangle is the relationship between three camera settings (aperture, shutter speed, and ISO) that together determine how bright your photo is and how it looks creatively. Change any one of them and you change the total light in the image, which means you have to compensate with one or both of the others if you want to keep the same brightness.
!Infographic diagram of the exposure triangle showing aperture, shutter speed, and ISO and their side effects
Before we go further, you need one piece of vocabulary: the stop.
💡 What Is a Stop of Light? > > One stop equals a doubling or halving of the amount of light reaching your sensor. Moving from ISO 400 to ISO 800 is one stop brighter. Moving from f/4 to f/5.6 is one stop darker. Moving from 1/250s to 1/500s is one stop darker. Every setting in the exposure triangle is measured in stops, so once you learn to think in stops, all three settings speak the same language.
Why These Three Settings Are Linked
- Changing any one setting changes the total exposure. You have to compensate with one or both of the others if you want to keep brightness constant.
- Think of it like a three-legged stool. Shorten one leg (reduce one setting's light contribution) and the stool tips unless you lengthen another leg.
- Each setting also has a creative side effect beyond brightness: depth of field (aperture), motion (shutter speed), and noise (ISO). That's why photographers don't always compensate automatically. Sometimes you want the image brighter or darker for a specific look.
The Order Recommended for Beginners
Most experienced shooters follow roughly the same mental sequence:
- Start with ISO. Match it to your available light so noise stays as low as possible.
- Choose aperture. Base it on your desired depth of field or creative goal.
- Adjust shutter speed to lock in correct exposure.
If motion control is your top priority (sports, kids, wildlife), flip steps 2 and 3: set shutter speed first, then adjust aperture. We'll practice both flows in the exercises later.
Aperture: Control Light and Depth of Field
Aperture is the adjustable opening inside your lens that controls how much light passes through to the sensor. It's measured in f-stops (also called f-numbers). Common values include f/1.4, f/1.8, f/2.0, f/2.8, f/4, f/5.6, f/8, f/11, and f/16.
- Aperture range: typically f/1.4 to f/22 (varies by lens).
- Primary side effect: depth of field (how much of the scene is in sharp focus).
- Smaller f-number = larger opening = more light.
- Each full stop doubles or halves the light entering the lens.
!Side-by-side photos of the same subject at f/1.8, f/5.6, and f/16 showing increasing depth of field
What Aperture Is and How f-Numbers Work
The f-number scale is where beginners trip up, because it feels backwards. A smaller number opens the lens wider and lets in more light. A larger number closes the lens down and lets in less.
- f/1.8 is a very wide opening. Great in low light. Very shallow depth of field.
- f/8 is a middle-ground opening. Sharp, versatile, works for most scenes.
- f/16 is a small opening. Deep depth of field but noticeably less light reaches the sensor.
The reason it's counterintuitive is math. F-numbers are fractions of the lens's focal length. So f/1.8 literally means 1/1.8 (a big fraction), and f/16 means 1/16 (a small fraction). You don't need to memorize the math. You just need to remember: low number = wide open = more light.
⚠️ Avoid This Common Confusion > > A "wide aperture" means a large physical opening and a small f-number (like f/1.8). A "narrow aperture" means a small physical opening and a large f-number (like f/16). Never say "use a small aperture for bokeh." Always specify the f-number direction so there's no ambiguity. If you mean lots of background blur, say "wide aperture, f/2.8 or lower."
Aperture and Depth of Field
Depth of field is the range of the scene that appears sharp from front to back. Aperture is the main control, though subject distance and focal length also matter.
- Wide aperture (f/1.8 to f/2.8): shallow depth of field. Subject is sharp, background is a creamy blur. This is where bokeh comes from.
- Narrow aperture (f/8 to f/16): deep depth of field. Foreground and background both sharp. This is what landscape shooters live in.
- Portrait starting point: f/1.8 to f/2.8 for a single subject with background separation. f/5.6 to f/8 for groups where every face has to be sharp.
The trade-off is precision. At f/1.4 on a 50mm lens, your in-focus zone at a portrait distance can be less than an inch. Miss focus on the eye and you'll land on the eyelashes or the tip of the nose. Wider apertures demand better focus technique.
Shutter Speed: Control Light and Motion
Shutter speed controls how long your sensor is exposed to light. It's measured in seconds and fractions of a second. Its creative side effect is motion: fast shutter speeds freeze action, slow shutter speeds blur it.
!Waterfall photographed at 1/1000s showing frozen droplets versus 1/4s showing silky smooth water
To freeze motion, use 1/500s or faster for everyday movement like a walking person or splashing water. For sports, wildlife, or anything faster, use 1/1000s or faster. Exact speed depends on how fast the subject is moving and how large it appears in your frame.
Understanding the Shutter Speed Scale
Shutter speed values run from long exposures to very short ones:
30s, 15s, 1s, 1/2s, 1/15s, 1/30s, 1/60s, 1/125s, 1/250s, 1/500s, 1/1000s, 1/2000s, 1/4000s, 1/8000s
- Slower shutter speed (longer exposure) = more light on the sensor.
- Faster shutter speed = less light.
- Doubling or halving the shutter speed equals one stop of light change.
Cameras typically show shutter speeds as just the denominator on screen. "500" means 1/500s. "2\"" means 2 seconds. Watch for that quotation mark.
Freeze It or Blur It: Creative Motion Control
Different shutter speed zones give you very different looks:
- 1/500s and faster: freezes motion. Sports, wildlife, kids running, water splashes.
- 1/60s to 1/250s: everyday range. Portraits, street, product shots where nothing is moving fast.
- 1/30s and slower: motion blur. Silky waterfalls, car light trails, panning shots that convey speed.
If you want intentional blur (like smooth water while the rocks stay sharp), you need a tripod. Otherwise everything blurs together and just looks like a mistake.
💡 The Reciprocal Rule for Handheld Shooting > > Set your shutter speed to at least 1 divided by your focal length to reduce camera shake. At 50mm, use at least 1/50s. At 200mm, use at least 1/200s. This is a guideline, not a guarantee. Image stabilization (in-body or in-lens), crop-sensor factor, and your own steadiness all affect the real minimum. Manufacturer-claimed stabilization figures vary by body and lens, so check your specific gear's spec page before trusting the marketing number.
ISO: Signal Amplification and Noise
ISO controls how much your camera amplifies the signal coming off the sensor. Higher ISO makes the image brighter but also amplifies noise (that grainy, speckled look you see in low-light shots).
!100% crop comparisons of the same scene at ISO 100, ISO 1600, and ISO 12800 showing increasing digital noise
⚠️ ISO Does Not Make Your Sensor More Sensitive > > This is one of the most repeated errors in beginner photography content. On most modern digital cameras, ISO does not change how the sensor captures light. The physical sensor's sensitivity is fixed. What ISO does is amplify the electrical signal after the exposure has occurred, which brightens the image but also amplifies any noise already present in that signal. For a deep dive, see the technical explanation from DPReview. On ISO-invariant sensors, common in many current mirrorless bodies, you can shoot at a low ISO and brighten in post with similar or better noise than pushing ISO in-camera.
Here's what that means in practice: on a modern ISO-invariant camera, if you underexpose at ISO 400 and lift the shadows in Lightroom, you often get a cleaner image than if you'd shot the same scene at ISO 3200 in-camera. Test your own body before you rely on this for a paid shoot.
The ISO Scale and What Each Value Means
ISO values typically run: 100, 200, 400, 800, 1600, 3200, 6400, 12800, and higher on some cameras.
- ISO 100 to 200: base ISO on most cameras. Cleanest output, best dynamic range.
- ISO 400 to 1600: everyday indoor and shade range on most bodies.
- ISO 3200 to 6400: low light, evening, dim venues.
- ISO 6400 and above: very low light. Modern full-frame and APS-C mirrorless cameras handle this range significantly better than older or smaller-sensor bodies.
Each doubling of ISO equals one stop brighter and one step noisier.
| Lighting Condition | Recommended ISO Range | Notes |
|---|---|---|
| Bright sunlight | 100 to 200 | Base ISO; cleanest possible files |
| Overcast or open shade | 200 to 400 | Slight boost for adequate shutter speed |
| Indoors with natural daylight | 400 to 800 | Depends on window size and time of day |
| Indoors under artificial light | 800 to 1600 | Watch for color casts from tungsten/LED |
| Dimly lit indoors or evening | 1600 to 3200 | Concerts, restaurants, sunset interiors |
| Night or very low light | 3200 to 6400+ | Push higher on full-frame; use a tripod when possible |
Exact values vary by camera model and sensor generation. Treat these as starting points, not laws.
Noise, Grain, and How to Minimize It
Noise shows up as random colored or luminance speckle, and it's worst in shadow areas. Here's how to keep it under control:
- Use the lowest ISO your lighting allows before your shutter speed becomes unusable.
- Expose to the right (ETTR): a slightly brighter exposure at the same ISO produces cleaner shadows after post-processing.
- Modern denoise tools like Lightroom's AI Denoise or DxO DeepPRIME can recover surprising detail from ISO 6400+ files.
- Sensor size matters. Micro Four Thirds sensors typically need about one stop lower ISO for equivalent noise performance compared to full-frame. If you're on an Olympus/OM System or Panasonic MFT body, mentally shift the reference table down one row.
How Aperture, Shutter Speed, and ISO Work Together
Here's the balancing act in one sentence: changing any one exposure setting by one stop changes brightness by one stop, so you have to change one or both of the remaining settings by an equal and opposite amount to keep the same overall exposure. That's the exposure triangle at work.
The Balancing Act Analogy
Think of exposure like filling a glass of water exactly to the brim. ISO, aperture, and shutter speed are three different taps. Open one tap wider (more light) and you have to partially close one or both others to avoid overfilling. Close one tap (less light) and you have to open one or both others to avoid an empty glass.
The real skill isn't finding a combination that fills the glass. There are dozens. The skill is choosing which tap to open or close based on the side effect you want in the image.
🧪 The Reciprocal Example > > Start with a correct exposure: ISO 400, f/4, 1/250s. > > You decide you want a blurrier background, so you open aperture to f/2.8 (one stop wider, one stop more light). To keep the same brightness, you either double your shutter speed to 1/500s or halve your ISO to 200. > > Now imagine you change to f/2.8 but don't compensate. Your image comes out one stop overexposed. That's not a mistake, it's a choice. You can dial in exposure compensation (in semi-auto modes) or just accept the brighter look if you want it. The triangle isn't a jail. It's a starting point.
When You Intentionally Break the Balance
- Sports photographer: needs 1/1000s to freeze action, so accepts ISO 1600 and lives with the extra noise.
- Landscape photographer: wants f/11 for edge-to-edge sharpness, so mounts a tripod and drops to 1/30s.
- Portrait photographer: wants f/1.8 for creamy bokeh in bright sun, so pushes shutter to 1/2000s or adds a neutral density filter.
The creative decision drives which setting is fixed. The other two exist to serve it.
Hands-On Exercises: Practice the Exposure Triangle
Reading about this is fine. Doing it is where the wiring in your brain actually rewires. Grab your camera. These three exercises take about 30 minutes total.
!Camera mode dial with annotations highlighting Manual, Aperture Priority, Shutter Priority, and Program modes
✅ Quick-Start Checklist Before Your Practice Session > > - Set your camera to RAW (or RAW+JPEG) so you can review full exposure data later > - Turn off Auto ISO for these exercises so you control all three variables > - Find a static subject for the aperture exercise and a moving subject (running water, traffic, a walking person) for the shutter speed exercise > - Note the light conditions (indoor, outdoor shade, or bright sun) before you start
💡 Can't Find a Mode Dial? Check Your Camera Brand Section > > If you can't locate A/Av, S/Tv, or M on your camera, jump down to the camera-specific notes section for Canon, Nikon, Sony, and Fujifilm placements.
Exercise 1 — Aperture Priority: See Depth of Field Change
- Set the mode dial to A (Nikon, Sony, Fujifilm) or Av (Canon).
- Set ISO to 400. Turn Auto ISO off.
- Point at a subject 2 to 3 meters away with a background at least 5 meters behind it.
- Shoot four frames at f/1.8 (or your widest), f/4, f/8, and f/16. Keep the exact same framing.
- Compare the results. The background transitions from blurry to sharp. Also notice that the camera automatically shifted shutter speed to keep exposure constant.
- Key observation: changing aperture by one full stop doubles or halves the shutter speed the camera picks. That's the triangle compensating in real time.
Exercise 2 — Shutter Priority: Freeze and Blur Motion
- Set the mode dial to S (Nikon, Sony, Fujifilm) or Tv (Canon).
- Set ISO to 400. Auto ISO off.
- Find moving water (a running tap, a fountain, a stream) or have someone walk past the frame.
- Shoot at 1/1000s, 1/250s, 1/60s, and 1/15s.
- Compare. At 1/1000s the water splits into individual droplets. At 1/15s it turns silky and the walker becomes a ghost.
- If images at fast shutter speeds are too dark, raise ISO to 800 or 1600 and repeat.
Exercise 3 — Manual Mode: Full Control
- Set the mode dial to M.
- Starting settings outdoors in shade: ISO 400, f/5.6, 1/125s.
- Look at your camera's exposure meter (the scale in the viewfinder or on the rear screen with a -3...0...+3 range). Aim for the center at zero.
- Without touching ISO or aperture, adjust shutter speed until the meter reads zero.
- Now change only the aperture to f/2.8. The meter should jump to roughly +2 stops overexposed. Correct it by raising shutter speed to 1/500s.
- Goal: internalize that every aperture change requires a compensating shutter speed change to hold exposure constant. Once that clicks, Manual mode stops feeling scary.
Exposure Settings Cheat Sheet by Scene
!Printable exposure settings cheat sheet showing recommended aperture, shutter speed, and ISO by shooting scenario
These are starting points. Your specific camera, lens, and available light will move them around. Use them to skip the blank-page paralysis, then refine from the histogram.
| Scene / Subject | Aperture | Shutter Speed | ISO | Notes |
|---|---|---|---|---|
| Portrait (outdoor sun) | f/2.0 to f/2.8 | 1/1000s or faster | 100 to 200 | Use ND filter if you want wider aperture in bright sun |
| Portrait (indoor natural light) | f/1.8 to f/2.8 | 1/125s to 1/250s | 400 to 1600 | Position subject near a window |
| Group photo (outdoor) | f/5.6 to f/8 | 1/250s | 100 to 400 | Keeps every face in sharp focus |
| Sports / action (outdoor) | f/2.8 to f/5.6 | 1/1000s to 1/2000s | 400 to 1600 | Prioritize shutter speed; let ISO float |
| Landscape / architecture | f/8 to f/11 | 1/125s (or slower on tripod) | 100 to 200 | Sharpest aperture range on most lenses |
| Waterfall motion blur | f/11 to f/16 | 1/4s to 2s | 100 | Requires tripod; add ND filter in daylight |
| Night street photography | f/1.8 to f/2.8 | 1/60s to 1/125s | 1600 to 6400 | Watch for camera shake at slow speeds |
| Astrophotography (static stars) | f/2.8 or wider | 15s to 25s | 3200 to 6400 | Sturdy tripod essential; use 500 rule for star trails |
| Low-light indoor event | f/2.8 or wider | 1/125s to 1/200s | 1600 to 6400 | Manual + Auto ISO with 1/125s minimum works great |
| Product / flat lay (studio) | f/8 to f/11 | 1/125s | 100 to 200 | Continuous light or strobe; tripod for consistency |
💡 Download the Free Cheat Sheet > > Want a printable PDF of this table to keep in your camera bag? Grab the free download and tape it to the inside of your bag flap. Handy when you're standing in a new scene at 6 a.m. and your brain isn't awake yet.
Modern Tools: Histogram, Zebras, and Live Exposure Preview
The rear LCD lies. It looks bright in the shade and dark in the sun. You cannot trust it for exposure. Instead, use one of these three tools that live inside every modern camera.
!Three histogram examples showing underexposed, correctly exposed, and overexposed images with corresponding photos
💡 Mirrorless Advantage: What You See Is What You Get > > Mirrorless cameras show a live exposure preview in the electronic viewfinder and on the rear screen. As you change aperture, shutter speed, or ISO, the image brightness updates in real time. This is one of the biggest practical wins over an optical-viewfinder DSLR for a beginner. You're not guessing anymore. You're seeing.
Reading the Histogram
The histogram is a bar graph showing the distribution of tones from pure black (left edge) to pure white (right edge).
- A well-exposed image in most scenes has tones spread across the middle without piling up against either edge.
- Clipping right: highlights are blown out. Sky is pure white, no detail recoverable.
- Clipping left: shadows are crushed. Dark areas are pure black with no texture.
- Enable the histogram on playback, and on mirrorless cameras, in live view too. Menu location varies by brand (see the camera notes section).
The histogram doesn't care how bright your LCD is or how sunny it is outside. It tells you the truth about your file.
Zebra Stripes for Highlight Warning
Zebra stripes are diagonal lines overlaid on your live view where highlights are approaching or hitting the clipping point.
- Available on most Sony, Fujifilm, and Panasonic mirrorless bodies. Also on many current Canon and Nikon mirrorless cameras.
- Set the zebra threshold to 95 to 100 to warn of blown highlights.
- Videographers often set zebras to 70 for skin-tone reference. Stills shooters usually don't need this.
- To enable: find "Zebra" in the Display or Shooting menu (exact location varies).
Expose to the Right (ETTR)
ETTR means intentionally pushing exposure as bright as possible without clipping highlights, then pulling brightness down in post-processing.
- Preserves more shadow detail and produces visibly cleaner noise, especially on ISO-invariant sensors.
- Use the histogram or zebra warnings to spot the clipping point, then dial exposure back by about half a stop for safety.
- Only useful when shooting RAW. JPEGs get baked at capture and don't benefit the same way.
- Test with your specific camera before relying on ETTR for a paid shoot. Sensor behavior varies.
Finding These Settings on Your Camera
The concepts are universal. The menus are not. Here's where the major brands put the exposure controls.
| Brand | Aperture Priority | Shutter Priority | Manual Mode | ISO Access |
|---|---|---|---|---|
| Canon | Av | Tv | M | Dedicated ISO button on top plate (most bodies) |
| Nikon | A | S | M | Dedicated ISO button; some bodies via i-menu |
| Sony (Alpha) | A | S | M | ISO on right side of control wheel by default |
| Fujifilm | A | S | M | Dedicated ISO dial on X-T series; ISO button on X-S/X-H |
| Panasonic / OM System | A | S | M | Function button (assignable) or Q-menu |
A note on Fujifilm: many X-series bodies (X-T5, X-Pro3, X-T30 II) use physical aperture rings on the lens and a dedicated shutter speed dial on top, instead of a mode dial. To get into "A" mode, set the shutter dial to A and pick an aperture on the lens ring. To get into "S" mode, set the aperture ring to A and pick a shutter speed on the dial. To get into "M," set both manually. It sounds weird until you use it, then it feels great.
For deeper reference, each manufacturer publishes their own exposure guide: Canon Learning Center, Nikon Imaging, Sony, and Fujifilm Learning Center.
💡 Crop Factor and the Reciprocal Shutter Speed Rule > > If you're on an APS-C body (Sony a6000 series, Fuji X, Canon R7/R10, Nikon Z50/Z fc), your focal length is effectively multiplied by roughly 1.5x for shake purposes. On Micro Four Thirds, it's 2x. So a 50mm lens on an MFT body behaves like a 100mm equivalent, and your minimum handheld shutter speed guideline becomes 1/100s. Image stabilization (IBIS or lens OIS) shifts this in your favor. Check your body or lens spec page for the manufacturer's claimed stops of stabilization.
Enabling Auto ISO Safely
Auto ISO lets the camera pick ISO while you handle aperture and shutter speed. It's a lifesaver for run-and-gun work like weddings, events, and street.
- Set a maximum ISO limit (start with 3200 or 6400) so the camera never pushes you into unusable noise territory. Menu location: ISO or Shooting menu on all major brands.
- Set a minimum shutter speed (available on most current Canon, Nikon, Sony, and Fuji bodies) so Auto ISO doesn't let shutter drop dangerously low when you're handheld.
- My go-to combo for events: Manual mode with Auto ISO on, aperture fixed at f/2.8, shutter fixed at 1/200s, ISO max 6400. Camera does the light-metering math. I focus on composition and moment.
Common Beginner Mistakes and How to Fix Them
I've made every one of these. Some of them multiple times. Here are the five that trip up almost every beginner, in the order they usually appear.
🧪 Stuck on Auto? Here Is Your Off Ramp > > Don't jump straight to full Manual. Progress in stages: Auto → Aperture Priority with fixed ISO → Shutter Priority → Manual with Auto ISO → Full Manual. Each step adds one variable of control. You build confidence without frying your brain.
Mistake 1 — Confusing f-Number Size with Aperture Size
- The mistake: assuming f/16 is a "large aperture" because 16 is a large number.
- The fix: always think about the physical opening. f/1.8 is wide open (large hole, lots of light). f/16 is nearly closed (small hole, little light).
- Memory trick: f-numbers are fractions. 1/1.8 is a bigger slice of the lens diameter than 1/16.
Mistake 2 — Leaving ISO on Auto When Practicing
- The mistake: you change aperture and nothing seems to happen to brightness. That's because Auto ISO is silently compensating.
- The fix: turn Auto ISO off during learning exercises. You need to see each setting's independent effect.
Mistake 3 — Setting ISO Too High Out of Habit
- The mistake: leaving ISO at 1600 or 3200 all day, even in bright sun, because you forgot to change it after last night's dim indoor shoot.
- The fix: check ISO first every time you pick up the camera. Start at ISO 100 outdoors in sun. Only raise it when aperture and shutter speed can't cover the gap.
Mistake 4 — Using a Slow Shutter Speed Handheld
- The mistake: shooting at 1/30s with a 50mm lens handheld, then blaming the lens for soft photos.
- The fix: apply the reciprocal rule as a floor (1/focal length, accounting for crop factor). Use a tripod or turn on stabilization for anything slower. Sharp lenses can't fix human hand-shake.
Mistake 5 — Relying Solely on the LCD for Exposure Judgment
- The mistake: judging exposure by how bright the LCD looks. Screen brightness settings and ambient light both distort your perception.
- The fix: use the histogram on playback or enable a live histogram in the viewfinder. Truth-telling data, not eyeball guessing.
Frequently Asked Questions About Aperture, Shutter Speed, and ISO
What is the exposure triangle in photography?
The exposure triangle is the relationship between the three camera settings that control how much light reaches the sensor: aperture (size of the lens opening), shutter speed (how long the shutter stays open), and ISO (how much the captured signal is amplified). Balancing these three settings determines both the brightness and the creative qualities of the final image.
Which should I set first — ISO, aperture, or shutter speed?
For most situations, start with ISO. Pick the lowest value that works for your lighting to minimize noise. Then choose aperture based on your desired depth of field or creative goal. Finally, adjust shutter speed to hit correct overall exposure. If stopping motion is the priority (sports, wildlife, kids), set shutter speed first and adjust the other two around it.
What is a good ISO for indoor photography?
A starting range of ISO 800 to 1600 works for most indoor shooting with natural light or moderate artificial light. In dimly lit venues or after sunset, ISO 1600 to 3200 or higher may be needed. Exact value depends on your camera's sensor size and generation. Full-frame mirrorless bodies generally handle ISO 3200 and above much better than older or smaller-sensor cameras.
What f-stop should I use for portrait photography?
For a single subject with background blur, start at f/1.8 to f/2.8. For two or more people where every face needs to be sharp, use f/5.6 to f/8. Wider apertures demand precise focus because depth of field is very shallow. At f/1.4, a small focus error can land on eyelashes instead of the eye.
What shutter speed do I need to freeze motion?
As a general guideline, 1/500s or faster handles everyday motion like a walking person or slow-moving water. For sports and wildlife, use 1/1000s or faster. Very fast subjects (racing cars, birds in flight) may need 1/2000s or faster. Exact requirement depends on how fast the subject moves and how large it appears in your frame.
Does raising ISO make my camera more sensitive to light?
Not exactly. On most modern digital cameras, ISO does not change how the sensor captures light. It amplifies the electrical signal after exposure, which brightens the image but also amplifies noise already present in the signal. On ISO-invariant sensors (common in many current mirrorless cameras), you can shoot at low ISO and brighten in post with similar or better noise than pushing ISO in-camera.
What does "one stop" mean in photography?
One stop equals a doubling or halving of the amount of light in an exposure. Going from ISO 400 to ISO 800 is one stop brighter. Going from f/4 to f/5.6 is one stop darker. Going from 1/250s to 1/500s is one stop darker. Thinking in stops is the key to quickly balancing the exposure triangle.
What is the difference between Aperture Priority, Shutter Priority, and Manual mode?
In Aperture Priority (A or Av), you set aperture and ISO. The camera picks shutter speed. Best for portraits and landscapes. In Shutter Priority (S or Tv), you set shutter speed. The camera picks aperture. Best for sports and motion control. In Manual mode, you set all three variables yourself for full creative control. Combine Manual with Auto ISO for the best of both worlds in changing light.
Sources
- ISO, Shutter Speed and Aperture for Beginners — Photography Life
- Understanding Exposure, Part 1: The Exposure Triangle — B&H Explora
- ISO Explained — DPReview
- What Is ISO in Photography? — PetaPixel
- What Is Aperture, Shutter Speed and ISO? — Sony
- The Exposure Triangle — Canon Learning Center
- Photography Basics: Exposure — Nikon Imaging
- Exposure Basics — Fujifilm Learning Center