What are the best camera settings and techniques for low light photography?
Quick answer: For low light photography, open your aperture as wide as possible (f/1.4–f/2.8), set a shutter speed no slower than 1/your focal length when shooting handheld, and raise ISO until your exposure is correct — using Auto ISO with a cap of 6400–12800 as a starting point. Shoot in RAW format, enable image stabilization, and use a tripod for static subjects. Every additional stop of light you gather through aperture or stabilization is one stop less noise you need to remove later.
Master low light photography with our complete guide: aperture, shutter speed, ISO, autofocus, gear, AI denoising, and smartphone tips — with scenario cheat sheets.
Key Takeaways
- Wide aperture (low f-number) is your single biggest low-light gain — prioritize fast lenses.
- Never let shutter speed drop below 1/focal length handheld to avoid camera shake blur.
- Auto ISO with a sensible cap keeps exposure correct without constant manual adjustment.
- Shoot RAW — it preserves dynamic range and maximises AI denoising effectiveness in post.
- A tripod unlocks exposures of any length for static scenes, landscapes, and astrophotography.
- Modern AI denoise tools (Lightroom, DxO, Topaz) can recover usable images from high-ISO files.
- Smartphones with Night Mode are capable for casual low light; dedicated cameras still lead on dynamic range.
What Is Low Light Photography?
Low light photography is any shooting situation where available light is too limited for your camera to produce a well-exposed, sharp image using standard "daylight" settings. The challenge sits at the intersection of three problems: sensor noise from raising ISO, camera shake or subject motion blur from slow shutter speeds, and autofocus systems that struggle to find contrast in dim scenes.
Here's the reality — most beginners assume they need a $3,000 camera to shoot in dim rooms. They don't. I shot weddings for years on a mid-range body with a $400 fast prime and produced files that clients paid four figures for. Technique and glass matter far more than the body on your neck strap.
💡 Tip: Low light is a spectrum > A dim living room lit by a single lamp is a completely different beast from a moonless Milky Way shoot. The first is fully recoverable with a fast prime lens and modern denoising. The second demands a tripod, long exposures, and a specific workflow. Match your strategy to the scenario, not the label.
Common Low-Light Scenarios
- Indoor portraits and family gatherings with window or lamp light
- Wedding receptions and ceremonies in dimly lit venues
- Live music concerts and stage performances
- Street and cityscape photography after sunset
- Astrophotography and Milky Way photography in rural darkness
The Three Core Challenges
- Insufficient light reaching the sensor causes underexposure. You either need more light (flash, faster lens) or more exposure (slower shutter, higher ISO).
- Slow shutter speeds required to gather enough light introduce motion blur from subject movement or camera shake from your hands.
- High ISO amplifies the sensor's signal but also amplifies noise — the grainy, speckled texture that ruins detail. B&H's technical explainer on image noise is worth a read if you want the full physics.
Understanding the Exposure Triangle in Low Light
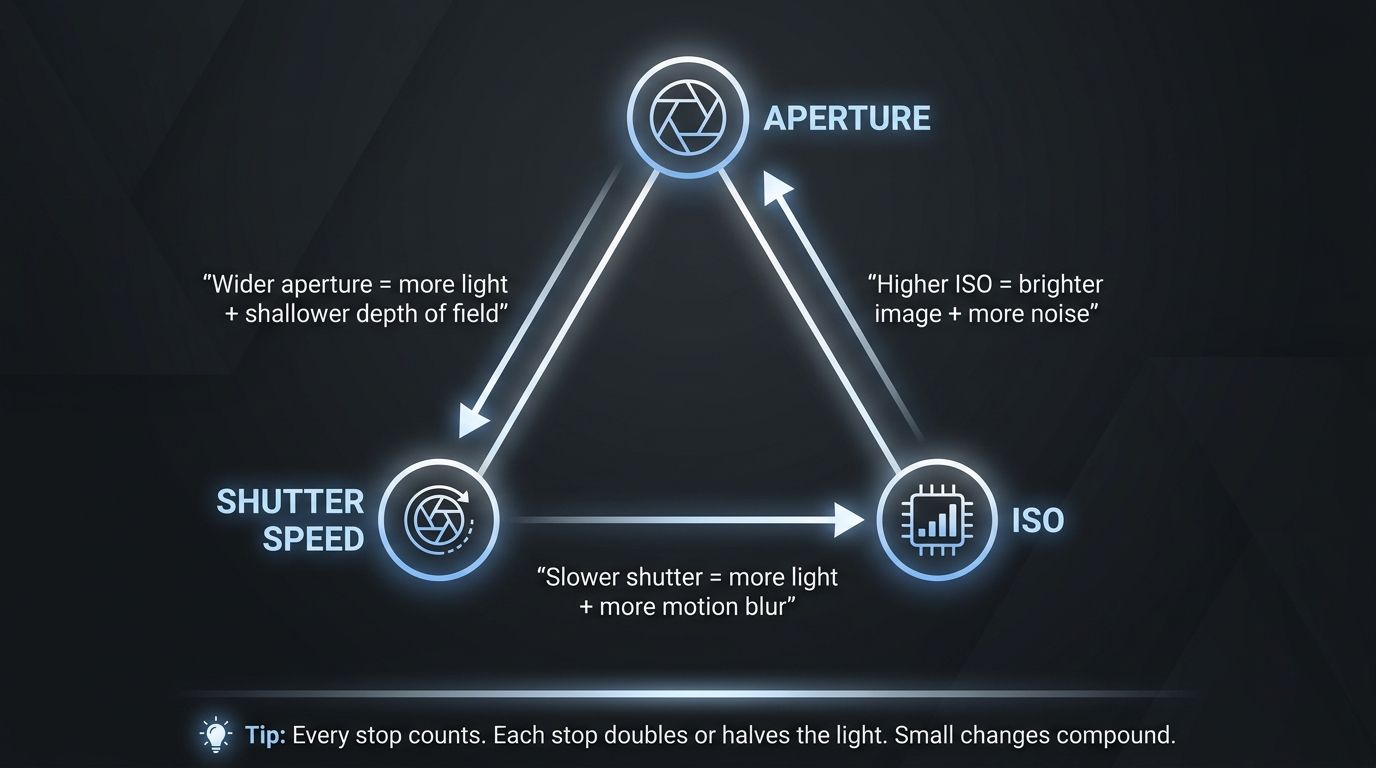
!Infographic diagram of the exposure triangle for low light photography showing how aperture, shutter speed, and ISO interact
Three settings control exposure on every camera ever made: aperture, shutter speed, and ISO. In low light, you're not just balancing them for a creative look — you're fighting for every photon. Each setting behaves differently when light is scarce, and understanding those behaviours is the difference between usable frames and a memory card full of blurry disappointment.
In low light, the three exposure settings do this:
- Aperture controls how wide the lens opening is — wider means more light hits the sensor.
- Shutter speed controls how long the sensor collects that light — longer means more light, but more risk of blur.
- ISO amplifies the signal after capture — higher ISO brightens the image at the cost of increased noise.
💡 Tip: Every stop counts > Each full stop of aperture, shutter speed, or ISO doubles or halves the light. Gaining one stop through a faster lens (say, f/2.8 to f/2.0) means you can drop ISO by one stop — which cuts noise significantly. Small changes compound fast.
Aperture: Your Biggest Lever
- A wider aperture (lower f-number) lets in significantly more light. An f/1.8 lens admits roughly four times as much light as f/3.5 — that's two full stops.
- Fast prime lenses (f/1.4–f/2.0) are the single biggest upgrade a low-light shooter can make.
- Wide apertures produce shallow depth of field, so your focus point needs to be precise. At f/1.4, an eye can be sharp while the nose is soft.
- Zoom lenses commonly max out at f/2.8, and kit zooms at f/3.5–f/5.6 are a real disadvantage in dim light — you're starting from a two-stop hole before you touch anything else.
Shutter Speed: Balancing Sharpness and Blur
!Side-by-side comparison of handheld low-light photos: blurry result at slow shutter speed versus sharp result at faster shutter speed
- The reciprocal rule: minimum safe handheld shutter speed equals 1/focal length. On a 50mm lens, that's 1/50s. On a 200mm, it's 1/200s.
- With in-body image stabilization (IBIS) or optical stabilization (OIS), many photographers can shoot 2–4 stops slower — but real-world gains vary based on technique and focal length. Test your own camera.
- For moving subjects — people dancing, performers, kids — shutter speed must be fast enough to freeze motion regardless of light level. That often means accepting higher ISO.
- A tripod removes camera shake entirely. Once mounted, shutter speed becomes a creative tool rather than a constraint.
ISO: Managing Noise
- Higher ISO amplifies the sensor's signal so the image looks brighter — but noise increases alongside it. There's no free lunch.
- Usable ISO ceiling varies significantly by camera model and sensor size. Don't trust generic numbers — test your own body. DXOMark's sensor test database publishes objective low-light ISO scores if you want a comparative benchmark.
- Auto ISO with a manually set maximum is the most practical approach for fast-moving situations. You focus on aperture and shutter; the camera picks ISO within your ceiling.
- Common misconception: high ISO doesn't cause overexposure. It amplifies signal and adds noise. Overexposure is a product of the full exposure combination.
Low Light Camera Settings: Step-by-Step Workflow
Here's the exact workflow I run through when I walk into a dim venue. Follow it in order:
- Switch to Manual (M) or Aperture Priority (Av/A) mode.
- Open aperture to the widest value your lens allows.
- Set shutter speed to at least 1/focal length — faster if your subject moves.
- Enable Auto ISO with a maximum cap appropriate to your camera.
- Turn on image stabilization (IBIS/OIS) if available.
- Set file format to RAW.
- Take a test shot, check the histogram, and adjust ISO cap or shutter speed if needed.
✅ Quick-Start Low Light Checklist
- Switch to Manual (M) or Aperture Priority (Av/A) mode
- Set aperture to the widest value your lens allows
- Set shutter speed to at least 1/focal length (or faster for moving subjects)
- Enable Auto ISO with a cap appropriate to your camera
- Turn on image stabilisation (IBIS/OIS) if available
- Set file format to RAW
- Review your first shot: adjust ISO cap or shutter speed if under- or over-exposed
💡 Tip: Aperture Priority vs. Manual Mode > Aperture Priority with Auto ISO works well for run-and-gun events — receptions, street, family gatherings. You set aperture and minimum shutter, the camera figures out the rest. Manual mode with a fixed ISO gives more control in predictable scenes like astro or tripod-mounted architecture, where lighting doesn't change frame to frame.
📌 Example: Why RAW matters most in low light > RAW files retain all the sensor data your camera captured. That means when you push shadows, correct white balance, or run AI denoising in post, you have the full dynamic range to work with. JPEGs bake in in-camera processing and compression — you've already thrown away information before you sit down to edit. In low light, that lost data is exactly what you need most.
Choosing the Right Shooting Mode
- Manual mode gives full control — ideal when you have time to dial in settings (landscapes, astro, tripod work).
- Aperture Priority with Auto ISO is the fastest approach for unpredictable situations like events or street photography.
- Shutter Priority is useful when freezing motion is the top priority — sports, concerts, dance floors. Pair with Auto ISO.
Setting Auto ISO Correctly
- Set a minimum shutter speed floor so the camera doesn't select dangerously slow speeds trying to keep ISO down.
- Set an ISO maximum based on your camera's acceptable noise threshold — test this before important shoots, not during them.
- At home, shoot a test series at escalating ISOs (800, 1600, 3200, 6400, 12800) of a well-lit scene, view at 100%, and pick your personal ceiling.
- Remember: acceptable ISO depends on output size. A 6400 shot that looks rough at 100% might be perfectly fine as a 1200px social post.
Low Light Settings Cheat Sheet by Scenario
!Visual cheat sheet table of recommended low light camera settings by scenario including indoor portrait, wedding, concert, street, cityscape, and astrophotography
Bookmark this table. It's the reference I wish someone had handed me in my first year.
| Scenario | Aperture | Shutter Speed | ISO Range | Tripod? | Notes |
|---|---|---|---|---|---|
| **Indoor Portrait** | f/1.4–f/2.8 | 1/60s–1/200s | 800–3200 | No | Fast prime recommended (35mm or 50mm) |
| **Wedding Reception** | f/1.8–f/2.8 | 1/100s–1/250s | 1600–6400 | No | Consider off-camera flash for consistency |
| **Concert/Stage** | f/1.8–f/2.8 | 1/200s–1/500s | 3200–12800 | No | Freeze performer movement, accept grain |
| **Street at Night** | f/1.8–f/2.8 | 1/60s–1/125s | 800–6400 | Optional | IBIS helps significantly |
| **Cityscape/Architecture** | f/8–f/11 | 5s–30s | 100–400 | Yes | Use remote shutter or 2s timer |
| **Astrophotography/Milky Way** | f/1.8–f/2.8 | 15s–25s (500 rule) | 1600–6400 | Yes | Requires dark-sky location |
⚠️ Warning: These are starting points, not rules > Venue lighting varies wildly. Your lens's maximum aperture varies. Your camera's noise ceiling varies. Use these numbers to get in the ballpark on your first frame, then adjust based on your histogram. Never trust a chart over your own review screen.
How to Nail Focus in Low Light
Focus failure is the number one complaint I hear from beginners shooting dim scenes. You nail the exposure, press the shutter — and the image is soft because the camera hunted and never locked. Here's how to fix it, in order of effort:
- Switch to a single AF point instead of wide or zone modes.
- Enable your camera's AF-assist beam (built-in or via flash).
- Try back-button focus so you can pre-focus and recompose.
- Use face or eye detection AF if your camera has it.
- If AF still hunts, switch to manual focus with peaking or magnified live view.
💡 Tip: Check your camera's AF sensitivity spec > Autofocus sensitivity is measured in EV (exposure value) — the lower the number, the better it works in the dark. Many modern mirrorless cameras autofocus down to -5 or -6 EV. Look up your specific body's rated AF sensitivity in the manufacturer's spec sheet before assuming your gear is the problem.
Autofocus Techniques
- Use your camera's AF-assist beam (built-in or from an external flash) to project a grid onto the subject, giving the AF system contrast to lock on.
- Select a single AF point rather than wide/zone modes. Wide modes hunt because they're evaluating too many low-contrast areas at once.
- Back-button focus — assigning AF to a rear thumb button instead of the shutter half-press — lets you pre-focus and recompose without the camera re-hunting every time you press the shutter.
- Face and eye detection AF in modern mirrorless bodies is surprisingly effective even in dim conditions. Turn it on and let the computer do the work.
Manual Focus Fallback
- Switch to manual focus the moment AF hunts repeatedly. It's faster than waiting for a lock that never comes.
- Use focus peaking if your camera offers it — sharp edges get highlighted in a colour of your choice on live view or the EVF.
- Magnified live view lets you zoom in digitally on the subject to confirm sharpness before firing.
- For static scenes (landscapes, astro), focus at infinity manually using a bright star or the lens's distance scale, then switch off AF so nothing changes between frames.
Gear That Actually Helps in Low Light
Let's break down the actual gear that moves the needle, in order of impact:
- Fast prime lenses (f/1.8 or wider) — the single biggest low-light upgrade for any system.
- In-body or optical image stabilization — lets you shoot slower shutter speeds handheld.
- A camera with a modern sensor — larger and newer sensors generally handle high ISO better.
- A sturdy tripod — unlocks unlimited exposure time at base ISO for static scenes.
- A remote shutter release or 2-second timer — kills vibration during long exposures.
💡 Tip: A fast lens beats a better camera body > Moving from an f/3.5 kit zoom to an f/1.8 prime gains you roughly 3.5 stops of light. That's often more impactful than upgrading from a crop-sensor to a full-frame body. If your budget's limited, buy the glass first. Bodies come and go; good lenses last two decades.
Fast Lenses (Wide Maximum Aperture)
Fast primes at f/1.8 or wider are the highest-impact upgrade for any low-light shooter, full stop. Every major mount has them at a range of price points — Sony E, Canon RF, Nikon Z, Fuji X, Micro Four Thirds. A 50mm f/1.8 exists on nearly every system for under $250 new.
!Indoor portrait photograph taken at f/1.8 in low light showing shallow depth of field and warm ambient light
- Prime lenses with f/1.8 or wider apertures are the highest-impact low-light purchase you can make.
- Fast primes exist across all major mounts at prices from budget ($200) to professional ($2,000+).
- Fast zooms (f/2.8 constant aperture) offer flexibility but weigh more and cost more than an equivalent prime.
- Wider apertures demand more precise focus. Missed focus at f/4 might still look sharp; at f/1.4, it's obvious.
Image Stabilization: IBIS and OIS
- In-body image stabilization (IBIS) moves the sensor to counteract shake and works with any lens mounted to the body.
- Optical image stabilization (OIS) is built into specific lenses and performs differently depending on the system.
- Some cameras combine IBIS and OIS for maximum effectiveness — check your body-lens combination in the manufacturer's specifications.
- Stabilization fights camera shake, not subject movement. If your subject is moving, shutter speed still governs blur.
⚠️ Warning: IBIS ratings vs. real-world results > Manufacturer IBIS stop ratings follow the CIPA DC-007 image stabilization standard — the industry test protocol. Real-world gains typically land in the 2–4 stop range depending on focal length, technique, and how caffeinated you are. Take marketing numbers as ceiling values, not guarantees.
Sensor Size and Tripods
- Larger sensors (full-frame vs. APS-C vs. Micro Four Thirds) generally collect more light per pixel at a given ISO, resulting in cleaner high-ISO images. But sensor quality improvements have made modern crop-sensor cameras genuinely competitive. Check DXOMark's camera test rankings for your specific model rather than assuming full-frame is automatically better.
- A sturdy tripod is the most underrated low-light accessory. It enables arbitrarily long exposures with zero camera shake and unlocks base ISO for the cleanest possible files.
- A remote shutter release — or the camera's built-in 2-second timer — prevents vibration from your finger pressing the shutter button during long exposures. Free feature, huge quality boost.
Very Dark Conditions: Night and Astrophotography
Once you leave dim-but-lit interiors and step into genuine darkness — rural night skies, unlit landscapes, long-exposure cityscapes — the entire workflow shifts. You're on a tripod. Shutter speed becomes creative, not defensive. ISO drops back down because you have all the time in the world to collect light.
!Milky Way photograph captured on a tripod with a long exposure showing a starry night sky above a dark landscape
For Milky Way photography, use the widest aperture your lens allows (f/1.8–f/2.8), a shutter speed calculated with the 500 rule (500 ÷ focal length, giving 15–25 seconds on typical wide-angle lenses), and ISO in the 1600–6400 range depending on your camera. Exact values depend on your focal length, sensor size, and how dark your sky actually is. PetaPixel's Milky Way guide has more depth if you want to go further.
✅ Astrophotography Pre-Shoot Checklist
- Check moon phase — a new moon or crescent gives the darkest skies
- Use a light pollution map to find a dark sky site
- Fully charge batteries and bring a spare — cold nights drain batteries faster
- Set focus to infinity manually using live view on a bright star
- Calculate your maximum shutter speed using the 500 rule: 500 ÷ effective focal length
- Bring a red-light headlamp to preserve night vision
- Enable Long Exposure Noise Reduction if your camera offers it (doubles exposure time)
📌 Example: The 500 Rule (and its limits) > Divide 500 by your effective focal length to get the maximum shutter speed in seconds before stars start to trail. At 24mm on full-frame, that's roughly 20 seconds. On high-megapixel sensors, some photographers use 300 as the divisor, or the more precise NPF rule. Treat 500 as a starting-point guideline, not a hard law of physics.
Milky Way Photography
- Shoot during astronomical darkness — at least 1.5 hours after sunset — well away from significant light pollution.
- Starting settings: widest aperture your lens allows, shutter speed per the 500 rule, ISO 1600–6400.
- A star tracker lets you use longer exposures without star trails if you want deep-sky detail.
- Post-processing RAW files is essential. Night skies often show a blue or magenta cast that needs colour calibration.
Long-Exposure Cityscapes and Light Trails
- Use a sturdy tripod and your camera's lowest native ISO (often ISO 64–200) for maximum dynamic range.
- Aperture f/8–f/11 maximises depth of field and creates a starburst effect on point-source lights.
- Shutter speeds of 5–30 seconds smooth water and blur vehicle light trails. For exposures beyond 30 seconds, use Bulb mode.
- A neutral density (ND) filter allows long exposures at dusk when ambient light is still moderate — useful for smoothing waterfalls or clouds at sunset.
Post-Processing Low-Light Photos with AI Denoise
I've tested this personally on files that used to be trash-can candidates — ISO 12800 wedding reception frames, ISO 6400 concert shots. AI denoise is the single biggest workflow change in low-light photography in the last decade. It doesn't just smooth noise; it distinguishes noise from detail and preserves texture that traditional sliders would smear away.
Here's how the current landscape shakes out:
!Before and after comparison showing a high-ISO photo before AI noise reduction and after AI noise reduction with clearly improved clarity
| Tool | Works On | Workflow Stage | Approx. Cost (2026) | Strengths | Limitations |
|---|---|---|---|---|---|
| **Lightroom AI Denoise** | RAW files in Lightroom | During develop | Adobe Creative Cloud subscription (varies — verify current pricing on Adobe website) | Tight Lightroom integration, no export needed | Requires Lightroom subscription |
| **DxO PureRAW** | RAW files (standalone or plugin) | Before import into host app | One-time purchase or subscription (varies — verify on DxO website) | Strong optical corrections alongside denoising | Adds an extra step to workflow |
| **Topaz Photo AI** | RAW and JPEG (standalone or plugin) | Flexible — before or after editing | One-time purchase (varies — verify on Topaz website) | Also handles sharpening and upscaling | Can be slow on older hardware |
Refer to official documentation for current capabilities: Adobe's Reduce Noise guide, DxO PureRAW, and Topaz Photo AI.
💡 Tip: Always denoise RAW files, not JPEGs > AI denoising tools work best on uncompressed RAW data where all the original pixel information is intact. JPEG compression has already discarded data before you opened the file, which limits how much noise can be cleanly removed without softening detail.
⚠️ Warning: Accuracy note on AI tool comparisons > AI denoise performance evolves rapidly with each software release. Rather than trust any static ranking, check the vendor documentation linked above for current capabilities before you commit to a tool.
Traditional vs. AI Noise Reduction
- Traditional luminance and colour noise sliders in Lightroom Classic or Camera Raw smooth noise but can soften fine detail and texture in the process.
- AI-based denoisers analyse the image at a deeper level to distinguish noise from real detail, generally preserving sharpness better at high ISOs.
- For moderate ISOs (roughly under 3200 on a capable camera), traditional sliders often do the job. AI shines most at higher ISOs — 6400 and above.
- Both approaches work best on RAW. Shoot RAW whenever you expect to push ISO.
Basic AI Denoise Workflow in Lightroom
- Import your RAW file into Lightroom and make initial exposure and white balance corrections.
- Navigate to the Detail panel and click "Denoise" under AI Denoise — Lightroom generates a new DNG file.
- Review the result at 100% zoom and adjust the Amount slider. Higher values remove more noise but may soften fine detail.
- Continue editing the resulting DNG normally. Sharpening, tone curves, and local adjustments all apply cleanly after denoising.
Smartphone Low Light Photography
Can you do low light photography with a smartphone? Yes — for many situations, absolutely. Modern flagship phones with Night Mode use computational photography to stack multiple exposures, producing bright and reasonably clean results that would have required a dedicated camera five years ago. As of 2026, dedicated cameras with larger sensors still generally offer greater dynamic range and manual control, but the gap has narrowed significantly for casual and social use.
💡 Tip: Phones vs. cameras in low light — a current-state trade-off > Right now, dedicated cameras with larger sensors still generally outperform smartphones in dynamic range and high-ISO quality. But computational photography is closing the gap fast. For social sharing, family moments, and casual use, a modern flagship phone is a very capable low-light tool. For paid client work or large prints, dedicated cameras still lead.
Using Night Mode Effectively
- Night Mode automatically takes multiple exposures and blends them to brighten the scene and reduce noise. Hold the phone as still as you can while it fires — you'll see a countdown.
- Brace the phone against a wall, table, or railing for longer Night Mode exposures. Some phones allow 10–30 second exposures on a tripod.
- On iPhone, the Night Mode icon appears automatically in low light and can be manually adjusted by tapping. See Apple's Night Mode documentation for your iOS version.
- Avoid Night Mode for fast-moving subjects — the multi-frame blend creates ghosting. Use the fastest available manual or Pro mode setting instead.
Pro/Manual Mode and Third-Party Apps
- Many Android flagship phones include a Pro or Manual mode with direct control over ISO, shutter speed, and white balance.
- Third-party apps like Halide (iPhone) and ProCam X (Android) offer RAW capture and full manual controls on phones that support them.
- Shoot in RAW (ProRAW on iPhone or DNG on Android) for more editing latitude — particularly for white balance and shadow recovery.
- Use a small phone tripod or a GorillaPod for any exposure longer than roughly 1/15s. Handheld shots below that will blur no matter how steady you think you are.
Low-Light Settings Decision Framework
!Flowchart diagram for choosing low light camera settings based on subject motion and tripod availability
When you're standing in a dim scene with seconds to decide, you don't want to think through the whole exposure triangle. You want a decision tree. Here it is:
Is your subject moving?
- YES → Set shutter speed first to freeze motion (at least 1/250s for walking, 1/500s+ for fast action). Then open aperture as wide as possible. Then raise ISO until exposure is correct.
- NO → Do you have a tripod?
- YES → Use base ISO for cleanest files. Any aperture (choose for depth of field). Use long shutter speed as needed.
- NO → Apply the reciprocal rule for shutter speed. Open aperture wide. Raise ISO to compensate.
When Subject Motion Determines Settings
- Moving subjects — people, performers, animals — demand a shutter speed floor. At least 1/250s for walking; 1/500s or faster for fast action or performers under stage lights.
- Open aperture to compensate for the fast shutter, then raise ISO until exposure is correct.
- Accept some grain over motion blur for important moments. AI denoising can clean up ISO noise; nothing recovers a blurry face.
When a Tripod Changes Everything
- With a tripod, shutter speed stops being a limiting factor for static subjects. Drop to base ISO (often 64–200) for the cleanest possible file.
- For landscapes, architecture, and astro, always use a tripod when the light lets you go long.
- Use the camera's 2-second timer or a remote release. Pressing the shutter button introduces vibration you don't notice with your eye but the sensor absolutely records.
Frequently Asked Questions About Low Light Photography
What ISO should I use for low light photography?
There's no single correct ISO — it depends on your camera, the available light, and your output size. Start at ISO 800–1600 and raise from there until your exposure is correct. Run a test at home at ISOs 800, 1600, 3200, 6400, and 12800 to find your camera's personal ceiling — the highest setting where noise is still acceptable to you. Modern AI denoising can extend that ceiling considerably.
What is the best aperture for low light photography?
The widest your lens allows — the lowest f-number. For low-light work, a maximum aperture of f/1.8 or wider is strongly recommended. A prime at f/1.8 admits roughly four times more light than a kit zoom at f/3.5 — two full stops, which is a massive practical difference.
What shutter speed should I use in low light?
For handheld shooting, apply the reciprocal rule: at least 1/your focal length. On a 50mm lens, that's 1/50s minimum. For moving subjects, you need faster — at least 1/250s for a walking person, 1/500s+ for fast action. With a tripod and static subjects, shutter speed can be as long as you need.
Do I need a full-frame camera for low light photography?
No. Full-frame sensors generally gather more light per pixel and produce cleaner high-ISO files, but modern APS-C and Micro Four Thirds cameras are highly capable in low light — especially paired with fast lenses and AI denoising. A fast prime on a crop-sensor body will usually outperform a slow kit zoom on a full-frame body. Buy the glass first.
How do I focus accurately in low light?
Start with a single AF point instead of wide area mode to reduce hunting. Enable your camera's AF-assist beam. Use face or eye detection AF on modern mirrorless bodies. If AF still hunts, switch to manual focus and use focus peaking or magnified live view to confirm sharpness. For astro and static scenes, focus manually on a bright star at infinity.
Can I do low light photography with a smartphone?
Yes, for many situations. Modern flagship phones with Night Mode use computational photography to stack multiple exposures — producing bright, reasonably clean results. As of 2026, dedicated cameras with larger sensors still generally offer more dynamic range and control, but the gap is narrowing. For social and casual use, your phone is a very capable low-light tool.
Should I shoot RAW or JPEG in low light?
RAW, strongly. RAW files preserve all the sensor data, giving you maximum latitude for shadow recovery and AI noise reduction in post. JPEGs are processed and compressed in-camera, which throws away information you can't get back. The difference is most obvious at high ISOs — exactly where you need the flexibility.
Does image stabilization help in low light?
Yes. IBIS or OIS reduces camera shake, letting you shoot slower shutter speeds handheld without blur. Real-world benefit typically lands in the 2–4 stop range depending on technique and focal length, though manufacturer ratings (based on CIPA standards) sometimes quote higher. Stabilization does not freeze a moving subject — shutter speed still controls motion blur.
Sources
- Low Light Photography Tips — Photography Life
- Understanding Low-Light Performance — DPReview
- Camera Sensor Rankings and Tests — DXOMark
- Reduce Noise in Lightroom — Adobe Help Center
- DxO PureRAW — DxO Official Site
- Topaz Photo AI — Topaz Labs
- CIPA DC-007 Image Stabilization Standard — CIPA
- How to Photograph the Milky Way — PetaPixel
- Understanding Image Noise — B&H Photo Explora
- Take Photos in Night Mode — Apple Support