What is the best monitor for photo editing in 2026?
Quick answer: The best monitor for photo editing in 2026 depends on your workflow and budget, but most photographers will be well served by a 27-inch 4K IPS or OLED display with 99% sRGB and at least 90% Adobe RGB coverage, a Delta E of 2 or lower, and hardware calibration support. For print work, prioritize wide-gamut Adobe RGB panels; for web and social, a well-calibrated sRGB monitor is sufficient.
Researching the best monitor for photo editing in 2026? Compare color accuracy, Adobe RGB coverage, panel types, and price tiers to find your ideal display.
Key Takeaways
- Look for a Delta E of 2 or lower for professional color accuracy; Delta E at or below 1 is ideal for print-to-screen matching.
- 27-inch 4K is the sweet spot for most editing desks; 32-inch suits photographers who want more workspace or edit panoramics.
- IPS panels give you consistent color at wide angles; OLEDs deliver deeper blacks but carry some burn-in risk with static editing UI.
- Adobe RGB coverage matters for print workflows; sRGB-only monitors are fine for web-only photographers.
- Hardware calibration with a colorimeter (not software alone) is essential for sustained color accuracy.
- Budget IPS displays under ~$400 can still hit Delta E ≤ 2 after proper calibration.
- The full color pipeline matters — your GPU's 10-bit output and OS color management are as important as the monitor itself.
What Makes a Monitor Good for Photo Editing?
Here's the reality: most "4K monitors" sold on Amazon are built for gaming or office work. They look great out of the box because they're punchy and oversaturated. That's the opposite of what you want for editing.
A photo editing monitor has one job — show you what your file actually looks like, so what you see is what you (or your lab) print and post. That means measured color accuracy, a known color gamut, and a panel that stays consistent from edge to edge.
Five or six specs separate a real editing monitor from a dressed-up gaming display:
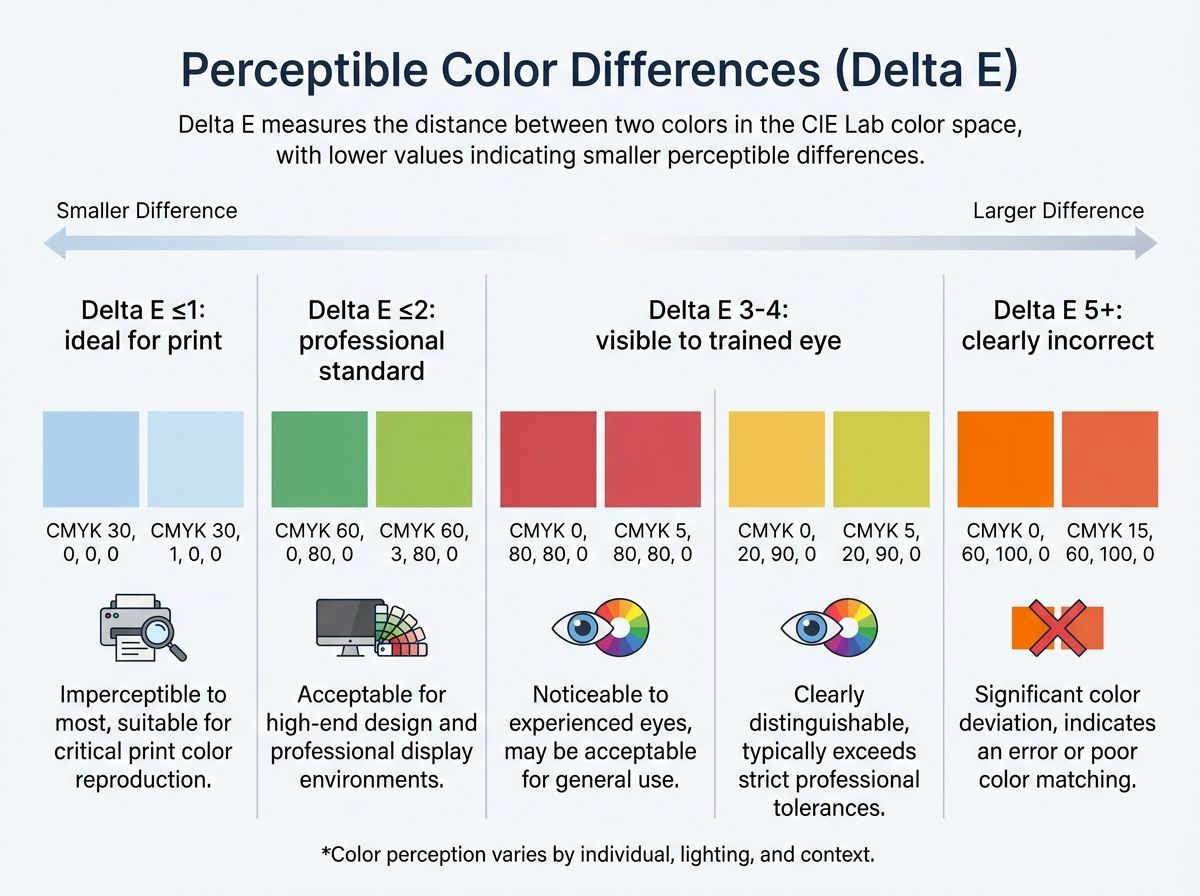
- Color accuracy (Delta E ≤ 2). The lower the number, the closer on-screen color matches the reference. Delta E above 3 is visible to the eye.
- Color gamut coverage. At minimum 99% sRGB. For print, 90%+ Adobe RGB.
- Panel type. IPS, Nano-IPS, or OLED. Avoid TN and most VA for color work.
- Resolution and size. 4K (3840×2160) at 27–32 inches is the standard.
- Bit depth. True 10-bit, or 8-bit + FRC at the entry tier.
- Hardware calibration support. A hardware LUT lets a colorimeter write corrections directly to the monitor instead of degrading the GPU signal.
Color Gamut: sRGB, Adobe RGB, and DCI-P3 Explained
A color gamut is the range of colors a display can physically reproduce. Three gamuts matter for photographers:
- sRGB — the standard for the web, social platforms, and almost every consumer screen. If your work lives on Instagram, a website, or client galleries viewed in a browser, this is the gamut your audience sees.
- Adobe RGB — wider than sRGB, especially in the greens and cyans. It covers more of the CMYK gamut used in professional printing, which makes it the gamut of choice for soft-proofing prints.
- DCI-P3 — a cinema gamut that's also the native space of many newer OLED and Apple displays. Relevant if you edit HDR or cross over into video.
Adobe RGB isn't universally "better." If you never print, a wide-gamut Adobe RGB monitor can actually cause problems — colors will look oversaturated in any app that isn't color-managed. Match the gamut to the workflow.
Delta E: The Color Accuracy Number That Actually Matters
Delta E is a single number that tells you how far off a monitor's color is from the reference it's trying to display. Smaller is better.
- Delta E ≤ 1 — differences are effectively invisible. This is the target for print-to-screen matching.
- Delta E ≤ 2 — considered professional-grade; imperceptible to most viewers.
- Delta E 3–4 — visible to a trained eye.
- Delta E 5+ — clearly incorrect for color-critical work.
One catch: factory Delta E figures are measured at a point in time. Monitor backlights and phosphors drift. BenQ's guidance is to recalibrate every 4–6 weeks for professional use. Without that, even a factory-calibrated "pro" display will drift above Delta E 2 over months of heavy use.
Panel Technology: IPS, OLED, and VA Compared
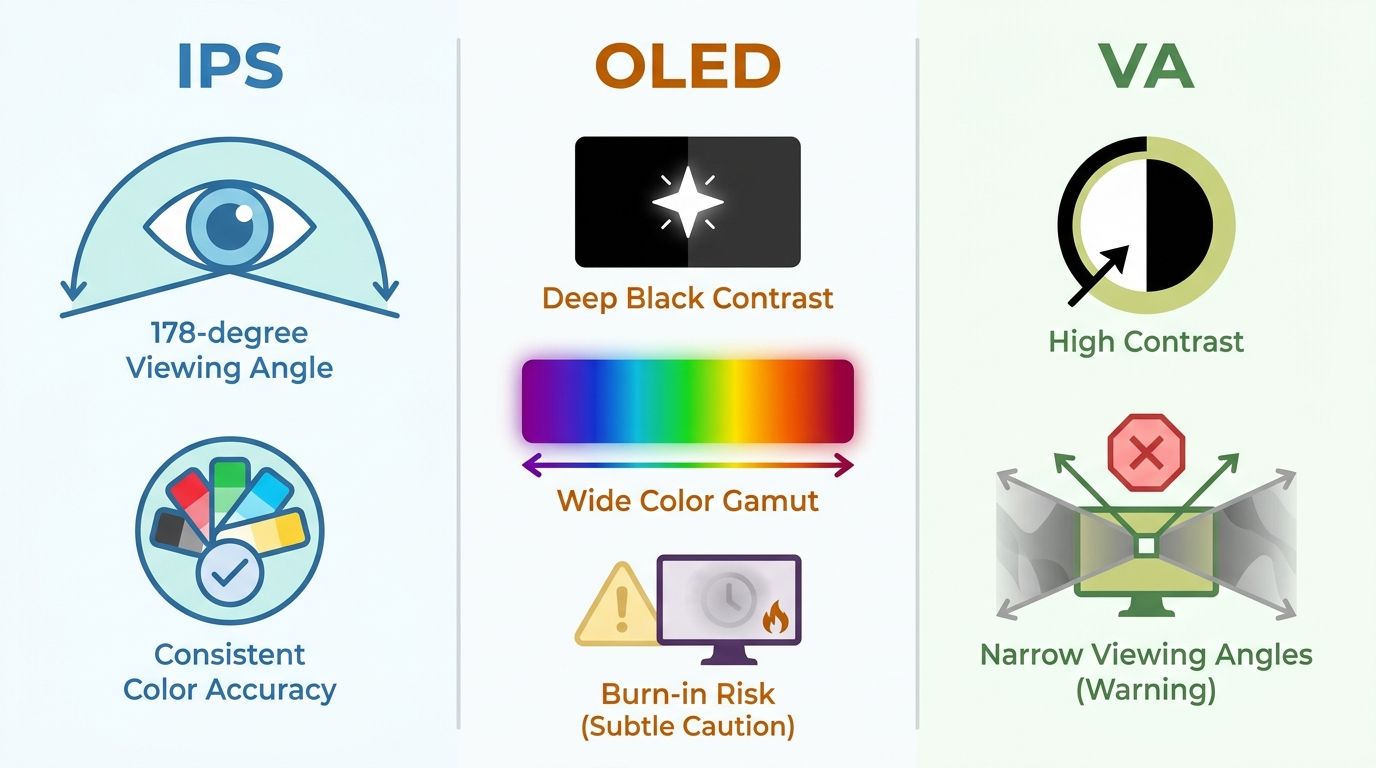
- IPS — the default choice. Viewing angles up to 178°, consistent color across the panel, and long-term reliability. Good baseline for any photo editing workflow.
- OLED — per-pixel contrast (true blacks), wide gamut coverage, fast response. There is some risk of burn-in when static editing UI elements (Lightroom develop panel, Photoshop toolbars) sit on-screen for many hours daily. Mitigations like pixel-shift, pixel-refresh, and lower peak brightness help but don't eliminate the risk.
- VA — higher native contrast than IPS, but narrower viewing angles and "black smearing" on fast transitions. Generally not recommended as a primary editing display.
- Nano-IPS / IPS Black — improved contrast over standard IPS while keeping consistent color. A strong middle ground for editors who want better blacks without OLED's tradeoffs.
No panel is perfect. Every one of these involves a compromise somewhere.
Resolution and Size: Finding the Right Balance
4K at 27 inches (~163 PPI) is the practical sweet spot for most editing desks. You get enough pixel density to see sharpness, noise, and fine texture at 1:1, plus comfortable UI scaling in Lightroom and Photoshop.
- 27-inch 4K — best balance of detail and desk footprint.
- 32-inch 4K (~140 PPI) — more canvas for panoramics or multi-panel editing; sit a bit further back.
- 1080p on anything 27 inches or larger — pixel-level editing becomes imprecise. Skip it for a primary display.
If you're on Mac, macOS applies HiDPI scaling by default, so a 27-inch 4K displays at a "Retina-like" effective resolution. Verify scaling behavior at your working distance before you buy.
Photo Editing Monitor Checklist
- Delta E ≤ 2 (factory-calibrated or measured by an independent lab)
- 99% sRGB coverage minimum; 90%+ Adobe RGB for print work
- IPS, Nano-IPS, or OLED panel (skip TN and most VA)
- 4K (3840×2160) resolution at 27–32 inches
- 10-bit display output (8-bit + FRC is acceptable at entry level)
- Hardware LUT or hardware calibration support (pro tier)
- USB-C with display signal + charging if you work from a laptop
Tip — Why factory calibration isn't enough. Even monitors shipped with a factory calibration certificate drift over time as backlights and phosphors age. X-Rite and BenQ both recommend hardware calibration with a colorimeter every 4–6 weeks for professional use, or every 6 months for casual editing. Factory reports are a starting point, not a permanent guarantee.
At-a-Glance Comparison: Top Photo Editing Monitors
The table below pulls key specs for a cross-section of popular photo editing monitors in 2026. Figures reference manufacturer spec sheets and independent measurements from RTINGS.com and PetaPixel where available. Where a spec varies by review method or isn't publicly measured, we note "see source."
Tip — How to read this table. Higher is better for sRGB, Adobe RGB, and DCI-P3 coverage (these measure how much of each color space the monitor can reproduce). Lower is better for Delta E (this measures color error — below 2 is professional-grade).
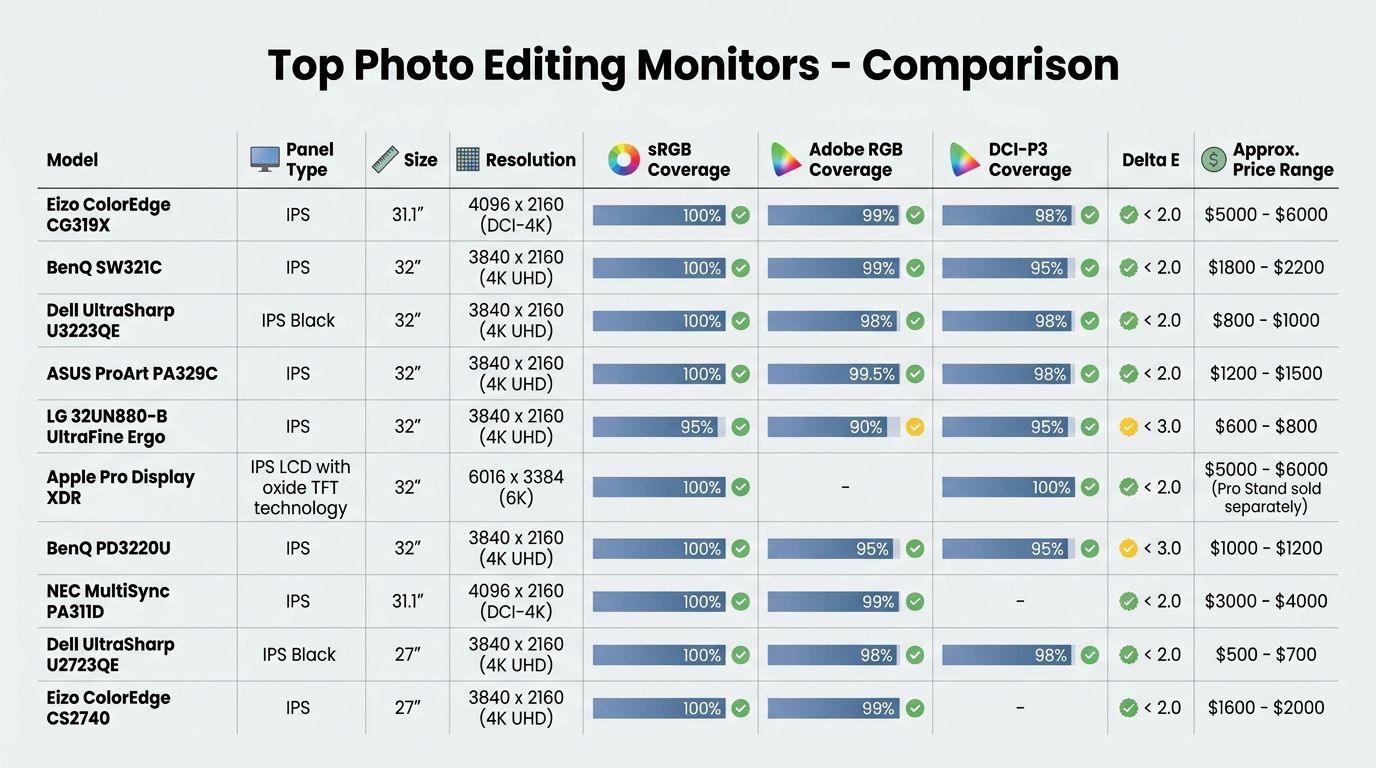
| Model | Panel Type | Size | Resolution | sRGB Coverage | Adobe RGB Coverage | DCI-P3 Coverage | Delta E (typical) | Approx. Price Range |
|---|---|---|---|---|---|---|---|---|
| ASUS ProArt PA279CRV | IPS | 27" | 4K (3840×2160) | ~100% | ~99% | ~99% | ≤ 2 (factory) | ~$450–$600 |
| BenQ SW272U | IPS | 27" | 4K (3840×2160) | ~100% | ~99% | ~97% | ≤ 1.5 (factory report) | ~$1,000–$1,300 |
| Dell UltraSharp U2725QE | IPS Black | 27" | 4K (3840×2160) | ~100% | ~90% | ~98% | ≤ 2 (claimed) | ~$600–$800 |
| Apple Studio Display | IPS | 27" | 5K (5120×2880) | ~100% | see source | ~99% (P3) | see source | ~$1,500–$1,900 |
| Eizo ColorEdge CS2740 | Wide-gamut IPS | 27" | 4K (3840×2160) | ~100% | ~99% | ~98% | ≤ 2 (factory) | ~$1,600–$2,000 |
| LG 27UK850-W | IPS | 27" | 4K (3840×2160) | ~99% | ~75% | ~96% | ≤ 3 (uncalibrated) | ~$350–$500 |
| LG UltraFine 32UQ85R | Nano-IPS | 32" | 4K (3840×2160) | ~99% | ~95% | ~98% | see source | ~$700–$900 |
| BenQ PD2706UA | IPS | 27" | 4K (3840×2160) | ~100% | ~92% | ~95% | ≤ 1.5 (factory report) | ~$550–$750 |
| ViewSonic VP2786-4K | IPS | 27" | 4K (3840×2160) | ~100% | ~98% | ~98% | ≤ 2 (factory) | ~$700–$900 |
Prices are approximate ranges observed at time of writing and will change. Verify current pricing and specs at the retailer and manufacturer before purchasing. All coverage figures and Delta E values are drawn from manufacturer spec sheets and independent reviews; always check the latest independent measurement for the specific unit you're considering.
Best Monitors for Photo Editing by Budget
⚠️ Price disclaimer. Every price band below is an approximate range based on recent retail observations. Monitor pricing moves constantly — verify at B&H, Amazon, or the manufacturer before you buy. "Under $400" today might be "under $450" by the time you read this.
Entry Level (Under ~$400): Solid sRGB, Calibration-Friendly
At this tier you're looking for a 27-inch 4K IPS panel that hits 99% sRGB and Delta E ≤ 2 after calibration. Adobe RGB coverage is typically 70–85% here, which is fine if your work ends up on the web, Instagram, or client galleries.
Monitors like the LG 27UK850-W and similarly-priced ViewSonic and Dell IPS models fit this bracket. Pair any of them with an entry-level colorimeter like the Datacolor SpyderX and you'll unlock color accuracy that a stock, uncalibrated mid-range monitor can't match.
You don't need a $1,200 display to edit for Instagram. You need a well-calibrated $350 IPS panel.
Mid Range (~$400–$800): Wide Gamut, Better Uniformity
This is the tier most working photographers land in. Expect 95%+ Adobe RGB or 98%+ DCI-P3 coverage, factory Delta E ≤ 2, and the first appearance of hardware uniformity compensation — which evens out brightness variation across the panel so the corners don't look darker than the center.
The ASUS ProArt PA279CRV, BenQ PD2706UA, and ViewSonic VP2786-4K all sit here. If your workflow mixes web delivery with occasional prints or photo books, this tier is the pragmatic buy.
Upper Mid Range (~$800–$1,500): Creator-Grade, Factory Calibrated
Monitors in this tier typically ship with an individual factory calibration report (not a model-average spec) and 99%+ Adobe RGB. More importantly, they add a hardware LUT — the monitor stores calibration data internally, so corrections don't degrade your GPU's 10-bit output signal.
The BenQ SW272U and Dell UltraSharp 32-inch 4K SKUs fall in here. This is the tier where you stop guessing about color and start trusting the screen for commercial work.
Professional (~$1,500 and Up): Reference-Grade Accuracy
Eizo ColorEdge CS and CG series monitors anchor the top tier. You're paying for self-calibration sensors built into the bezel, hardware uniformity compensation, extensive factory QC, and 5-year warranties. These are the displays you buy when color accuracy is directly tied to your invoice.
The Apple Studio Display also lives in this price range for Mac-centric workflows, though it notably lacks hardware LUT calibration — you'll calibrate via software against macOS ColorSync, which is accurate but not as robust as hardware-LUT monitors.
For most photographers, there's a diminishing-returns curve past the upper-mid tier once you have a quality colorimeter workflow in place. If you're not doing commercial retouching or print production, a $900 BenQ SW plus a $200 colorimeter will outperform a $2,000 monitor that never gets recalibrated.
Best Monitor by Workflow
Budget is only half the question. What you shoot and where it ends up matters more.
⚠️ OLED burn-in note for editing workflows. OLED monitors deliver excellent contrast and wide gamuts, but they carry some risk of burn-in when static editing UI (Lightroom develop panel, Photoshop toolbars) stays on-screen for many hours a day. Use the monitor's pixel-shift and pixel-refresh features, enable OS screensavers, avoid pinned maximum brightness, and vary your content throughout the day. Don't panic — newer OLED panels and warranty coverage have improved significantly — but factor this in before buying an OLED as your daily editing display.
Best for Print Photographers
Prioritize 99%+ Adobe RGB coverage and Delta E ≤ 1. Hardware calibration support is non-negotiable because you need the screen to match what comes off your (or your lab's) printer.
Wide-gamut IPS or Nano-IPS panels are the safest choice. OLEDs can also reach wide gamuts, but verify Adobe RGB coverage against an independent measurement rather than marketing specs — some OLEDs lead in DCI-P3 but trail in Adobe RGB.
Your soft-proofing workflow needs to be color-managed end to end: load the printer's ICC profile in Lightroom or Photoshop, enable soft-proofing, and compare against a physical print under a 5000K viewing light. Adobe's color management overview walks through how Lightroom Classic uses monitor and output profiles.
Best for Web and Social Media Photographers
sRGB accuracy is what matters. Instagram, Facebook, Chrome, Safari — they all deliver sRGB to viewers (and many strip or ignore embedded profiles). A wide-gamut Adobe RGB display is wasted here, and worse, it can push you toward color decisions that look fine on your screen and oversaturated on your audience's.
A well-calibrated 99% sRGB IPS monitor in the entry or mid tier is enough. Spring for 4K at 27 inches so you can evaluate sharpness at 1:1 — that part still matters for social crops.
Best for HDR Photo Editing
HDR grading needs:
- Peak brightness — 400 nits minimum, 600+ nits for real HDR work, 1000+ nits for reference-grade.
- Wide DCI-P3 or Rec. 2020 coverage.
- DisplayHDR certification — DisplayHDR 400 is largely marketing; DisplayHDR 1000 and above is what you want.
- HDR-aware application and GPU — confirm your editing app and GPU actually output HDR on your OS.
OLED panels are the natural fit thanks to per-pixel contrast and wide color volume, with the burn-in caveat above. If you edit HDR daily, build in pixel-shift and screen-saver mitigations from day one.
Best for Mac Users
macOS has a mature color management system in ColorSync, and it handles wide-gamut displays gracefully. The Apple Studio Display integrates tightly, but note it uses software calibration against the OS — not a hardware LUT in the display.
The LG UltraFine 4K and 5K lines are purpose-built for Mac compatibility with Retina-level density. On any Mac setup, verify HiDPI scaling behavior: a "4K" monitor in macOS often renders at a "looks like 1920×1080" or "looks like 2560×1440" default, which affects usable workspace. Test before you commit.
Buyer's Criteria: What Every Spec Actually Means
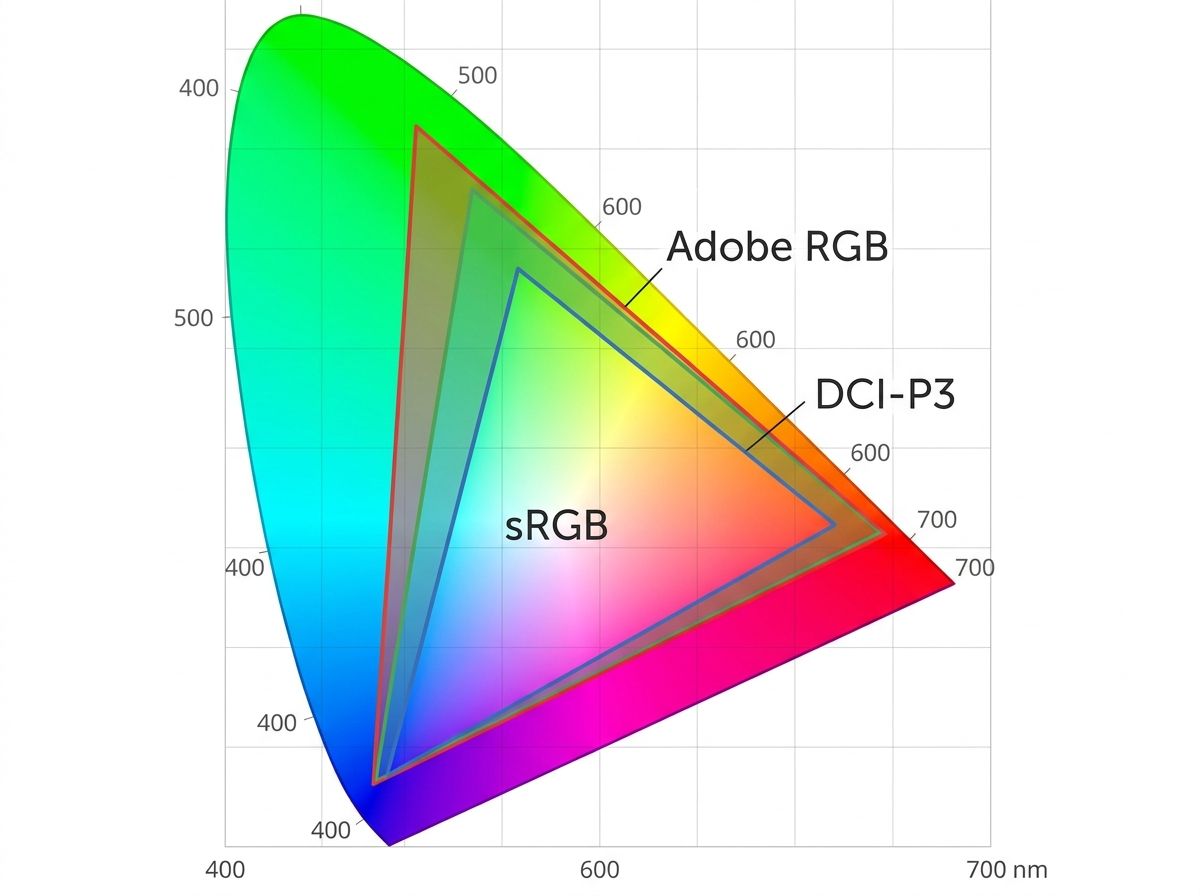
Is Adobe RGB or sRGB better for photo editing? Neither is universally better — it depends on where your photos end up. sRGB is correct for web, social, and most client-gallery delivery. Adobe RGB only pays off if you're printing or soft-proofing prints, because it covers more of the CMYK gamut used by professional print output.
With that out of the way, here's what the rest of the spec sheet actually tells you.
Tip — Bit depth matters for smooth gradients. An 8-bit panel displays ~16.7 million colors. 8-bit + FRC uses temporal dithering to simulate 10-bit output — acceptable at entry level. A true 10-bit panel displays over a billion colors, which is where banding in smooth skies, skin tones, and shadow-to-highlight transitions actually disappears. For landscape and portrait work, 10-bit is a meaningful upgrade.
Tip — Check your GPU and cable too. A 10-bit monitor only delivers 10-bit output if your entire pipeline supports it. On Windows, you need a GPU that enables 10-bit output in the Nvidia or AMD control panel (most modern dedicated GPUs do, over DisplayPort or HDMI 2.1), a cable rated for the bandwidth, and the monitor set to a compatible input mode. On macOS, 10-bit is handled automatically when the display and connection support it. If any link in the chain is 8-bit, your billion-color panel outputs 16.7 million.
Brightness and Uniformity
For standard SDR editing, aim for 120–150 cd/m² luminance — this is the calibration target X-Rite and Datacolor recommend. Cranking brightness to 300+ nits for editing causes you to under-expose files because the screen is masking shadow detail with sheer luminance.
Uniformity is how consistent brightness and color are across the entire panel. Deviations above 10–15% from center to edge are a problem for wide images. Hardware uniformity compensation — found in mid-range and pro monitors — measures and corrects panel variation electronically. It's one of the clearer "you get what you pay for" features.
Connectivity: Ports That Matter for Photographers
- USB-C with DisplayPort Alt Mode + Power Delivery (60W+) — one-cable laptop connection. Essential if you edit on a MacBook or Windows laptop.
- DisplayPort 1.4 or Thunderbolt 3/4 — 4K at high refresh rates with full 10-bit color. The cleanest option for desktop setups.
- HDMI 2.1 — supports 4K 10-bit, but implementation varies. Check the spec sheet.
- USB-A hub ports — convenient for card readers and tablets without hunting behind the laptop.
Again: the whole color pipeline has to be aligned for 10-bit color to reach the panel. GPU output setting, cable bandwidth, monitor input mode. Skip one and you're sending 8-bit to a 10-bit display.
Ergonomics and Panel Size
- Adjustability — height, tilt, swivel, and pivot all reduce strain during long edits. A fixed-height display is a dealbreaker for an 8-hour editing day.
- Coating — matte anti-glare reduces reflections but softens perceived sharpness slightly. Glossy coatings (common on Apple displays) look richer but reflect every lamp in the room.
- Pixel density — 27-inch 4K is ~163 PPI, which most editors find balanced. 32-inch 4K drops to ~140 PPI, giving you more usable workspace for the same detail per pixel.
How to Calibrate a Photo Editing Monitor (Step-by-Step)
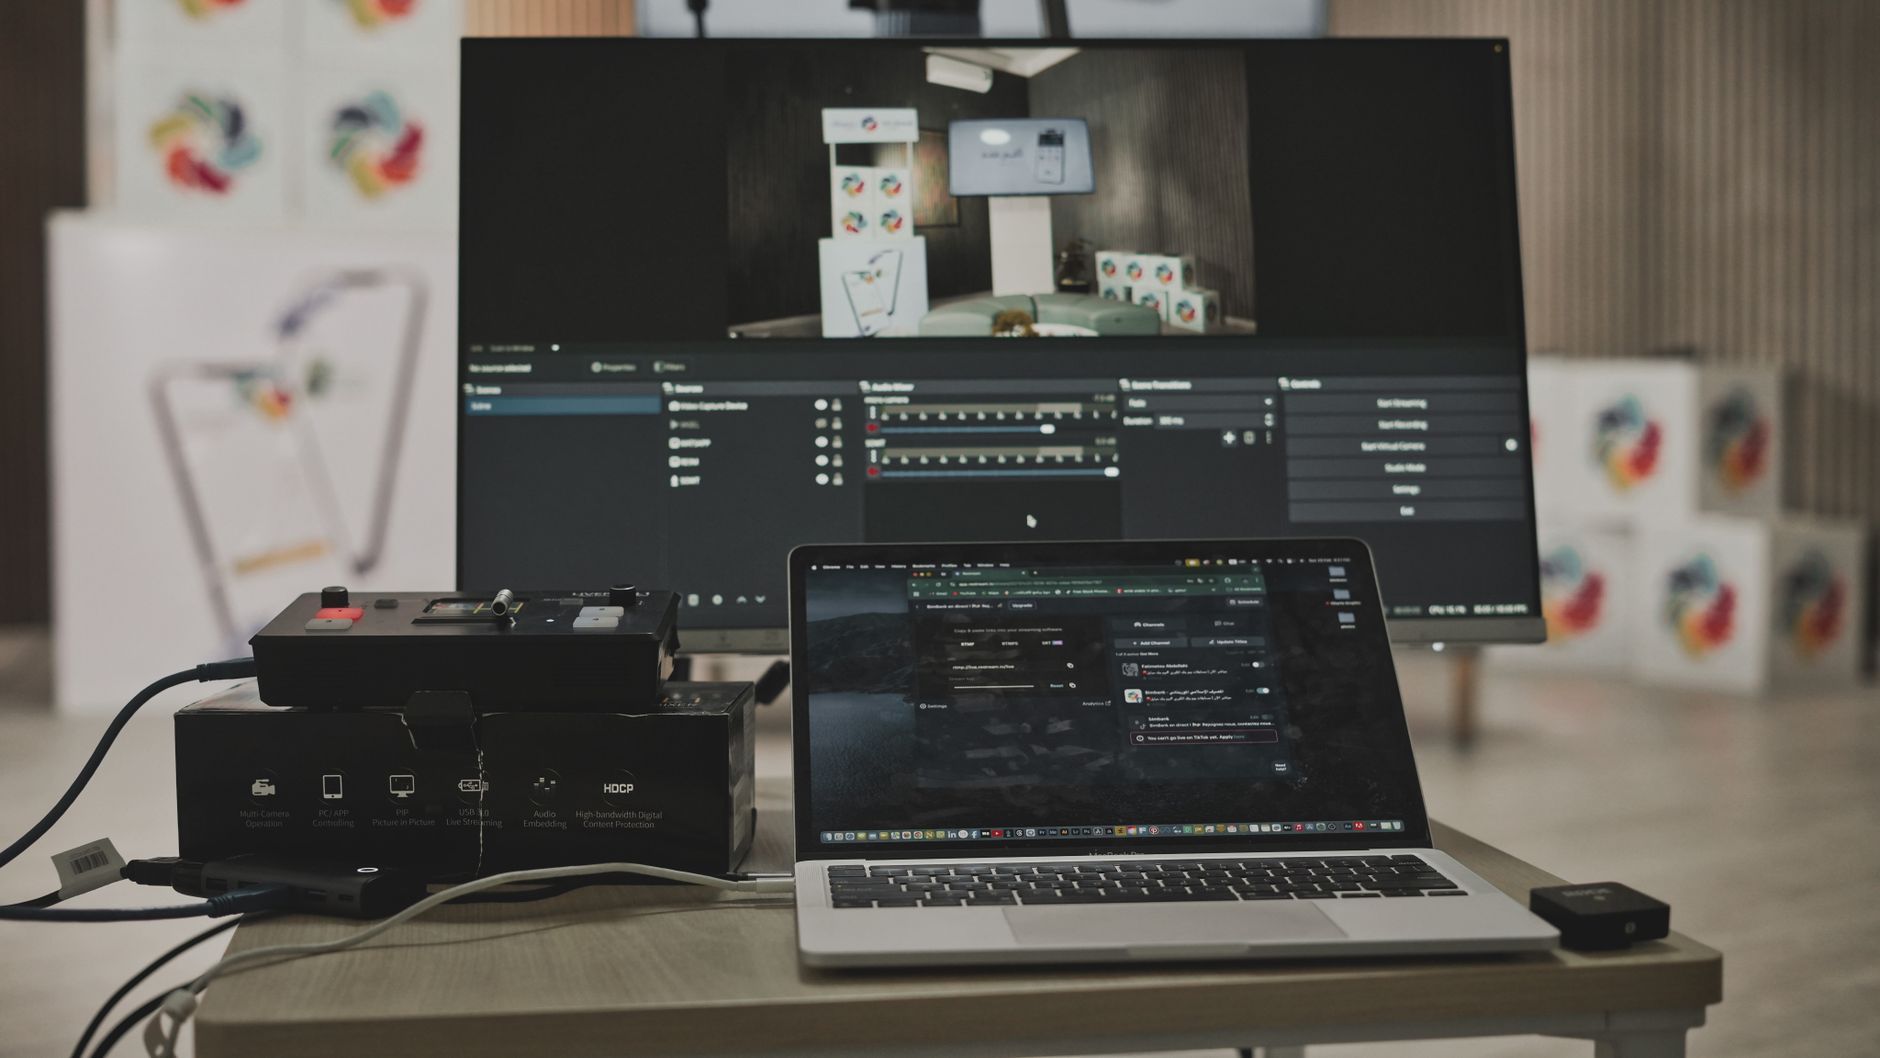
Buying a color-accurate monitor and never calibrating it is like buying a lens and never cleaning it. You lose most of what you paid for.
What You Need Before You Start
- A hardware colorimeter — Calibrite Display Pro, Datacolor SpyderX, or X-Rite i1Display
- Calibration software (bundled with the colorimeter: Calibrite PROFILER, SpyderX Pro)
- A monitor that has been powered on for at least 30 minutes
- Consistent, controlled ambient lighting — dim, around 5000K, no direct sunlight on the panel
Tip — How often should you calibrate? For professional use, every 4–6 weeks. Monitor backlights and phosphors drift, and BenQ and X-Rite both recommend this cadence. For casual editing, every 6 months is a minimum.
⚠️ Software-only calibration is not enough. Free tools like Windows Display Color Calibration or macOS's visual calibration wizard adjust GPU output, not the monitor's internal LUT. That degrades bit depth and produces an approximate, not measured, ICC profile. Only a hardware colorimeter measures actual panel output and produces a true ICC profile.
Step-by-Step Calibration Process
- Warm up the monitor. Turn it on at least 30 minutes before calibrating. Brightness and color output stabilize only after the backlight reaches operating temperature.
- Control your environment. Work in dim, consistent ambient light around 5000K. Close blinds or use blackout curtains. Variable light hitting the panel during measurement skews results.
- Reset the monitor to factory defaults. Use the on-screen menu to reset brightness, contrast, and color settings. Select the monitor's native color mode or sRGB mode as a starting point.
- Connect the colorimeter. Hang the puck flat against the center of the screen. There should be no gap where ambient light can leak between the sensor and the panel.
- Set calibration targets in software. White point: D65 (6500K). Gamma: 2.2. Luminance: 120 cd/m² for a typical room. Drop to 80–100 cd/m² if you work in a very dark space.
- Run the calibration. Let the software cycle through its color patches — usually 5–15 minutes. Don't move the colorimeter, don't change the room lighting, don't wake anything up on your desk.
- Save and load the ICC profile. Save the generated ICC profile with a dated filename. Make sure your OS loads it at startup (Windows Color Management; macOS System Settings → Displays → Color Profile). Verify in Lightroom or Photoshop that the app is honoring the monitor profile — soft-proofing should now show accurate output.
The specific colorimeters above (Calibrite, Datacolor, X-Rite) are cited as category leaders. Refer to each vendor's documentation for software-specific steps — Calibrite PROFILER and SpyderX Pro have slightly different UI but the same underlying workflow. The International Color Consortium maintains the ICC profile standard underpinning all of this.
Limitations and Tradeoffs to Know Before You Buy
Does OLED burn-in affect photo editing monitors? There is some risk when static editing UI elements — Lightroom panels, Photoshop toolbars, menu bars — are displayed for many hours a day. The risk varies by panel generation and usage pattern, and it is manageable with pixel-shift features, screensavers, varied content, and sensible brightness. It is a real consideration for a dedicated editing display, not a dealbreaker.
⚠️ No monitor is permanently accurate without calibration. Every Delta E figure and gamut coverage percentage you read — in spec sheets, review tables, this article — is measured under specific conditions and drifts over time. Factory calibration reports are a snapshot. Without periodic hardware recalibration, even reference-grade monitors fall out of spec within months.
OLED Burn-In: Real Risk, Manageable with Care
- Risk is highest when static UI stays on-screen for many hours daily — the exact pattern of a serious editor.
- Newer OLED panels include pixel-shift, pixel-refresh, and automatic brightness limiting to reduce the risk.
- Mitigation: enable all built-in burn-in prevention features, use OS screensavers after 10 minutes of inactivity, avoid maximum brightness, and vary content throughout the day.
- Check the manufacturer's warranty terms for burn-in coverage before committing an OLED to a professional editing workflow. Coverage varies widely.
Wide Gamut Monitors Require a Color-Managed Workflow End-to-End
Buying an Adobe RGB monitor doesn't automatically give you better color — it can give you worse color if the rest of the pipeline isn't color-managed.
- Apps that aren't color-managed (many games, some older software, unmanaged browser tabs, and some file viewers) will show oversaturated, inaccurate colors on a wide-gamut display.
- Lightroom, Photoshop, and Capture One are color-managed — confirm each is configured to use your monitor's ICC profile.
- Chrome, Firefox, and Safari are color-managed for tagged content, but untagged legacy web content won't be converted correctly.
- Always export for the output space. Social and web deliverables should be converted to sRGB on export — if you upload an Adobe RGB JPEG to Instagram, it'll look flat and washed out on nearly every viewer's screen.
Price Is Not a Guarantee of Accuracy
A well-calibrated $450 IPS monitor will beat an uncalibrated $1,800 pro display every time. Calibration workflow matters more than purchase price.
- Factory calibration reports represent accuracy at the factory, under factory conditions. Your room, your lighting, your usage patterns are different.
- A $200 colorimeter is the single highest-ROI accessory you can buy for photo editing.
- Prioritize independent measured data — RTINGS and published PetaPixel reviews — over marketing specs. Manufacturer spec sheets quote best-case numbers.
Frequently Asked Questions
What is the best monitor for photo editing in 2026? It depends on your workflow and budget. For most photographers, a 27-inch 4K IPS or Nano-IPS monitor with 99% sRGB, 90%+ Adobe RGB coverage, and Delta E ≤ 2 covers the majority of editing needs. Print-focused photographers should prioritize 99% Adobe RGB and hardware calibration support; web-only photographers can work from a well-calibrated sRGB-accurate display at a lower price point.
Is 4K necessary for photo editing? 4K (3840×2160) is not strictly required, but it is strongly recommended for editing on screens 27 inches and larger. The higher pixel density reveals fine detail — particularly useful for evaluating sharpness, noise, and texture at 1:1. At 1080p on a 27-inch screen, pixel-level editing becomes imprecise.
Do I need an Adobe RGB monitor for photo editing? Only if your workflow includes print output or soft-proofing. Adobe RGB covers more of the CMYK gamut used in professional printing, allowing more accurate on-screen previews of printed output. If your photography is exclusively for web and social media, a monitor with excellent sRGB accuracy is all you need and is typically more affordable.
What Delta E is acceptable for photo editing? For professional color-critical editing, look for a monitor with a measured Delta E of 2 or lower — at this level, color differences between the display and the target are imperceptible to the human eye. For print workflows where on-screen output must closely match physical prints, a Delta E of 1 or lower is preferred. Delta E values above 3 are generally visible and unsuitable for color-critical work.
IPS or OLED: which panel type is better for photo editing? Both are viable, with different tradeoffs. IPS panels offer consistent color at wide viewing angles, long-term reliability, and are well-suited to static editing environments. OLED panels deliver deeper blacks and can cover wide color gamuts, but carry some risk of burn-in when static editing UI elements are displayed for extended periods. Enabling pixel-shift features and varying content can help mitigate this.
How often should I calibrate my monitor for photo editing? For professional work, recalibrate every 4–6 weeks using a hardware colorimeter, since monitor backlights and phosphors drift over time. For casual editing, every 6 months is a minimum. Factory calibration reports reflect accuracy at time of manufacture and under controlled conditions, not in your specific working environment.
What size monitor is best for photo editing? A 27-inch 4K monitor is the most popular choice, offering a balance of detail, desk footprint, and comfortable viewing distance. A 32-inch 4K display suits editors who prefer a larger canvas or work with panoramic images and multiple editing panels side by side. Monitors smaller than 24 inches at any resolution are generally not recommended for primary editing use.
Can I calibrate a monitor without a hardware colorimeter? Software-only calibration tools (such as Windows Display Color Calibration) adjust the GPU's color output rather than the monitor's internal processing, which reduces bit depth and does not produce a true ICC profile. A hardware colorimeter measures the monitor's actual light output and generates an accurate profile. For reliable color-accurate editing, a hardware colorimeter is considered an essential tool.
Sources
- Best Monitor for Photo Editing — RTINGS.com
- International Color Consortium (ICC)
- Choosing the Right Monitor for Photo Editing — BenQ
- How to Calibrate Your Monitor — X-Rite
- Color Management Overview — Adobe Lightroom Classic
- Best Monitors for Photo Editing — PetaPixel
- SpyderX Monitor Calibrator — Datacolor
- ASUS ProArt Display Series — ASUS