What does a complete beginner need to know to start learning photography in 2026?
Quick answer: To start learning photography as a beginner, focus on three foundations: understanding the exposure triangle (shutter speed, aperture, and ISO), composing strong images using rules like the rule of thirds, and shooting consistently every day with whatever camera you own — including a smartphone. Everything else builds naturally from these three pillars.
Learn photography from scratch with this complete beginner's guide. Master the exposure triangle, composition, gear, and editing — plus a free 30-day starter roadmap.
Key Takeaways
- The exposure triangle (shutter speed, aperture, and ISO) controls every photo's brightness and feel.
- Composition rules like the rule of thirds instantly make images more compelling.
- Any camera works for learning; your phone is a legitimate starting tool.
- Shooting daily for 30 days builds skills faster than any course alone.
- Basic editing in Lightroom or a free alternative transforms raw captures into polished shots.
- Studying other photographers trains your eye as much as pressing the shutter.
- Consistent feedback from a community accelerates improvement dramatically.
Here's the reality: most beginners drown in YouTube tutorials, gear forums, and contradictory advice before they've taken 100 intentional photos. This guide cuts that noise. You'll learn the fundamentals, see how the gear stacks up honestly, follow a 30-day starter roadmap, and walk away with practice exercises you can run today on whatever camera you already own.
What Is Photography? A Beginner's Definition
Photography is the art and technique of capturing light to create images using a camera, a lens, and a sensor (or film). At its simplest, you're recording how light bounces off a subject and reaches a light-sensitive surface. That's it — the rest is creative choice.
The reason photography is so accessible right now is that the technical barrier has collapsed. A modern smartphone can produce images that would have required a $5,000 setup fifteen years ago. The hard part isn't operating the device. It's learning to see.
Tip — Photography Is a Learnable Skill > Every photographer you admire started by taking bad photos. The idea most often attributed to Magnum photographer Henri Cartier-Bresson — that "your first 10,000 photographs are your worst" — captures a real truth: volume of deliberate practice matters more than gear or talent. You won't see your progress in a week. You'll see it across a few hundred frames.
Why Anyone Can Learn Photography
A few things stack the deck in your favor:
- Modern cameras and smartphones handle exposure, focus, and color decisions automatically when you want them to. The barrier to a usable image is near zero.
- Photography is fundamentally about seeing and composing — visual skills that improve with deliberate practice, not with money.
- Manual controls unlock creative range, but starting in auto modes is completely valid. You're not cheating.
- This guide moves through the same path I'd take a friend through: concepts → gear → practice → editing → long-term growth.
The Exposure Triangle: Shutter Speed, Aperture, and ISO
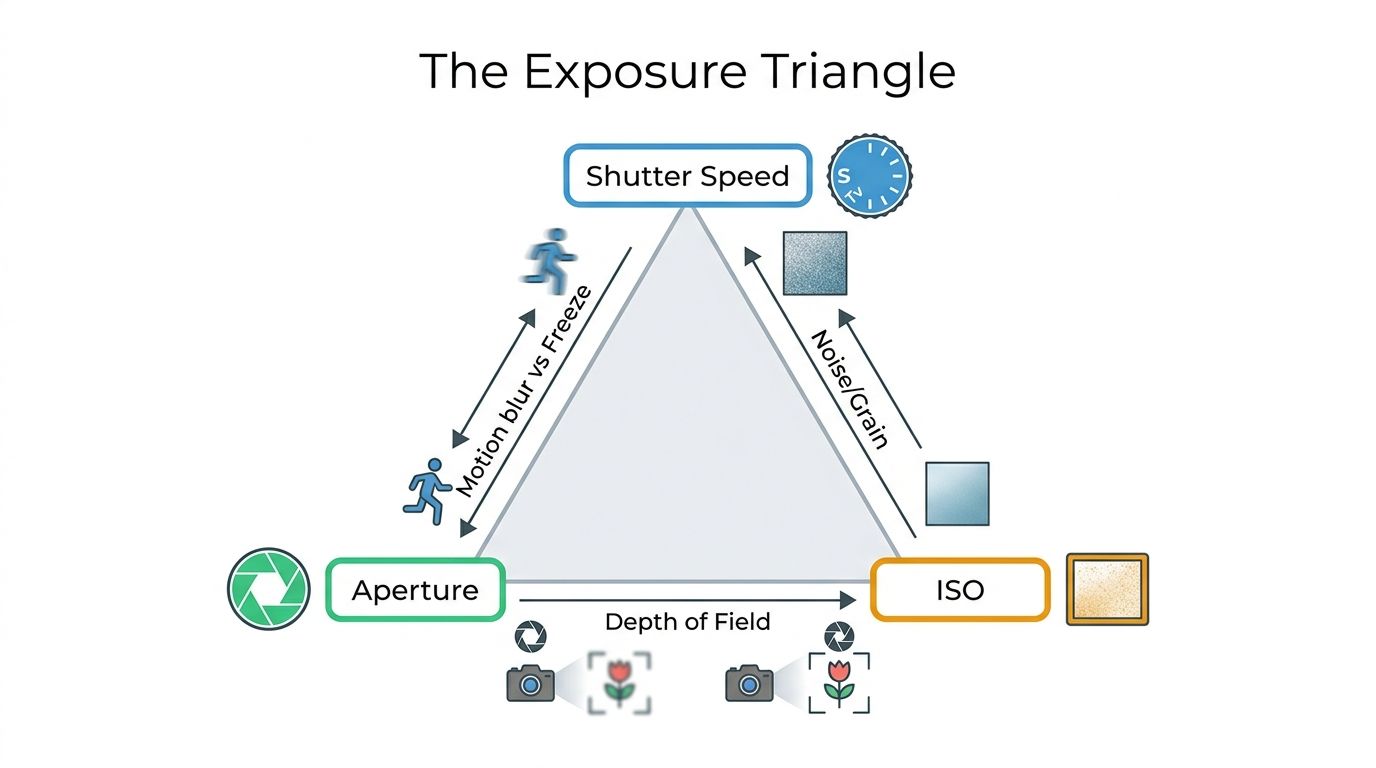
!Infographic diagram of the exposure triangle showing how shutter speed, aperture, and ISO interact to control exposure
What is the exposure triangle? The exposure triangle refers to three camera settings — shutter speed, aperture, and ISO — that work together to control how much light reaches the sensor and the creative look of your image. Change one, and you'll usually need to compensate with another to keep your exposure balanced.
This single concept is the most important thing you'll learn in photography. Master it and 80% of your "why does this photo look bad?" questions answer themselves. For a deeper technical breakdown, B&H Photo's Explora guide walks through the math of stops in detail.
Exposure Triangle Quick Reference
| Setting | What It Controls | Low Value Effect | High Value Effect | Creative Use |
|---|---|---|---|---|
| Shutter Speed | Length of time the sensor is exposed to light | Slow (e.g., 1/30s) = motion blur, more light | Fast (e.g., 1/1000s) = freezes motion, less light | Freeze sports/wildlife; blur waterfalls or light trails |
| Aperture (f-stop) | Size of the lens opening | Wide (f/1.8) = more light, shallow depth of field | Narrow (f/16) = less light, deep depth of field | Portraits with blurred backgrounds; sharp landscapes |
| ISO | Sensor's sensitivity to light | Low (100–400) = clean, less grain | High (1600+) = brighter in low light, more noise | Last resort to brighten dim scenes |
Tip — Start in Aperture Priority Mode > If full Manual feels overwhelming, switch your mode dial to Av (Canon) or A (Nikon/Sony/Fujifilm). You pick the aperture, the camera handles shutter speed. This single move teaches you depth of field faster than any tutorial.
⚠ Accuracy Note: Sensor Size Claims > Don't trust blanket statements like "DSLRs always have bigger sensors than mirrorless." Sensor size depends on the specific model. A Sony A7 IV (full-frame mirrorless) has a larger sensor than a Canon Rebel T7 (crop-sensor DSLR). Compare the actual specs on the manufacturer's page before drawing conclusions.
Shutter Speed: Freezing or Blurring Motion
Shutter speed is how long the camera's shutter stays open, measured in fractions of a second (1/1000, 1/250) or full seconds (1", 2", 30").
- Fast shutter (1/1000s and above): freezes action. Use for sports, kids running, birds in flight.
- Slow shutter (1/30s and below): introduces motion blur. Use for silky waterfalls, light trails, or sweeping motion effects.
- Handheld rule of thumb: your shutter speed should be at least 1 divided by your focal length to avoid camera shake. Shooting at 50mm? Keep shutter speed at 1/50s or faster.
Example caption: Cyclist frozen mid-pedal — 1/1000s, f/4, ISO 200.
Aperture: Controlling Depth of Field
!Side-by-side comparison photo showing the same subject at a wide aperture (shallow depth of field, blurred background) versus a narrow aperture (deep depth of field, sharp background)
Aperture is the opening inside your lens that controls how much light gets through, measured in f-stops (f/1.4, f/2.8, f/8, f/16).
Here's the part that trips up every beginner: the f-stop scale is inverted.
- Lower f-number (f/1.8): wider opening, more light in, shallower depth of field. Background goes creamy and blurred. Ideal for portraits.
- Higher f-number (f/11): narrower opening, less light in, more of the scene in focus. Ideal for landscapes where you want both the foreground rock and distant mountain sharp.
Memorize this once and you've cleared the biggest conceptual hurdle in photography.
ISO: Sensitivity and Noise
ISO is how sensitive your sensor is to incoming light. Higher ISO brightens your image but introduces digital noise (grain).
- Low ISO (100–400): cleanest image quality. Use whenever there's enough light.
- High ISO (1600+): brightens dim scenes (concerts, indoor events, night) but adds visible grain.
- Modern sensor behavior: newer full-frame cameras handle ISO 6400 surprisingly well; older or smaller-sensor cameras start showing noise earlier. Check sample images for your specific body on DPReview's learning center before assuming your camera's limits.
Practical rule: keep ISO as low as the scene allows. Only push it up when shutter speed and aperture can't fix the exposure on their own.
Composition Fundamentals Every Beginner Needs
Settings get you a technically correct photo. Composition gets you a photo people actually want to look at. These are the rules to internalize first:
- Rule of thirds — place key subjects on the intersections of a 3x3 grid.
- Leading lines — use roads, fences, or rivers to guide the eye to your subject.
- Framing — use natural elements (doorways, branches) to frame the subject.
- Negative space — leave deliberate empty area around your subject for emphasis.
- Fill the frame — get closer; your subject should occupy at least 30% of the image.
- Level horizons — check your horizon line unless you're tilting on purpose.
- Symmetry and patterns — center deliberately when symmetry exists; break patterns intentionally.
Tip — Get Closer Than You Think > The single most common beginner mistake I see is shooting too far away. Move your feet. Fill the frame. This one habit improves your photos immediately without touching a single setting.
The Rule of Thirds
!Photograph with a rule-of-thirds grid overlay showing the subject placed at a grid intersection point
Imagine a tic-tac-toe grid over your viewfinder. Place your subject — or the horizon line — along one of those lines or at one of the four intersection points. The image instantly feels more dynamic than a dead-center subject.
Most cameras and every smartphone have a grid overlay option in the settings. Turn it on today and leave it on for a month. After that, you'll see the grid even when it's off.
Leading Lines, Framing, and Negative Space
These three tools work together to control where the viewer looks:
- Leading lines: roads, fences, train tracks, hallways, shorelines. Anything that creates a directional pull.
- Natural framing: doorways, windows, arches, tree branches that surround your subject within the scene. This adds depth.
- Negative space: the empty area around your subject. A small subject in a sea of sky or wall creates mood and emphasis.
- Symmetry and pattern-breaking: symmetrical scenes feel balanced; deliberately breaking a pattern creates visual tension.
Once you understand the rules, you'll know when to break them. A centered, symmetrical portrait can be more powerful than a thirds-aligned one — when the choice is intentional.
✅ Composition Quick-Check Before You Shoot
- Is your subject placed on a rule-of-thirds intersection?
- Is there a leading line drawing the eye toward your subject?
- Have you eliminated distracting background elements?
- Are you close enough — does your subject fill at least 30% of the frame?
- Is your horizon line level (unless intentionally tilted)?
- Have you considered framing your subject using foreground elements?
Choosing Your First Camera: DSLR vs Mirrorless vs Smartphone
!Flat-lay comparison photo showing a DSLR camera, a mirrorless camera, and a smartphone side by side
Let's break down the actual differences without the brand-war noise.
DSLR vs Mirrorless vs Smartphone: Beginner Comparison
| Camera Type | Approximate Price Range (body only) | Best For | Key Advantage | Key Trade-off | Manual Control |
|---|---|---|---|---|---|
| Smartphone | $0 (already owned) – $1,200+ for flagship | Daily practice, travel, social media | Always with you; strong computational photography | Smaller sensor; limited optical zoom | Via native app or third-party (e.g., Halide, Lightroom Mobile) |
| Entry-level Mirrorless | ~$600–$1,200 USD (body + kit lens, varies by region/retailer) | Hybrid stills + video; portable systems | Compact, fast autofocus, modern feature set | Battery life shorter than DSLRs; pricier accessories | Full physical and menu control |
| Entry-level DSLR | ~$400–$800 USD (body + kit lens, varies by region/retailer) | Stills shooters on a budget; long sessions | Excellent battery life; mature lens ecosystem | Bulkier; manufacturers shifting focus to mirrorless | Full physical and menu control |
Prices are approximate at time of writing and vary by region, retailer, and inventory. Verify current pricing before purchase.
Tip — The Best Camera Is the One You Have > A flagship smartphone in 2026 is a serious photographic tool. Computational photography handles dynamic range, low-light noise, and color in ways dedicated cameras still struggle with. The real trade-offs are sensor physics (low-light performance at extreme ISO, true optical zoom) and the tactile feedback of physical dials. Don't let gear envy stop you from shooting with what's in your pocket. Sony has a solid breakdown of beginner camera considerations worth scanning if you're shopping.
Example — Gear Does Not Make the Photographer > Vivian Maier shot most of her iconic street work on a Rolleiflex. Sebastião Salgado has built a career on a relatively spartan kit. Henri Cartier-Bresson famously favored a single 50mm lens for decades. The skill of seeing is fully transferable across any camera.
What to Look for in a Beginner Camera
Don't buy on megapixels. Buy on these:
- Ergonomics and manual controls: physical dials for shutter, aperture, and ISO speed up your learning. Touchscreen-only menus slow you down.
- Lens ecosystem: check what lenses are available, used market prices, and third-party options (Sigma, Tamron, Viltrox).
- Battery life: DSLRs win here; mirrorless bodies typically need 1–2 spare batteries for a full day.
- Weight and size: the camera you leave at home doesn't take photos. Be honest about what you'll actually carry.
- Video capability: if you want 4K or hybrid video work, check frame rates and codec specs.
- Total system cost: body + kit lens + 64GB SD card + spare battery + camera bag. Budget the whole stack, not just the body sticker price.
Should You Start With a Kit Lens?
Yes. The 18-55mm (or equivalent) kit lens that ships with most entry bodies covers everything you need to learn the fundamentals. It's not the sharpest glass in the world, but it teaches you focal length, framing, and the relationship between aperture and depth of field.
A common first upgrade is the "nifty fifty" — a 50mm prime lens (or 35mm on crop sensors) with a wide f/1.8 aperture. Sharp, lightweight, and usually under $250. But here's the honest advice: don't buy a second lens until you've shot at least 1,000 frames with the one you have. Gear accumulation is one of the biggest reasons beginners stall.
Camera Modes and Settings: A Starter Cheat Sheet
What do those letters on your mode dial actually mean? Here's the plain-English version:
- Auto: the camera makes every decision. Useful when you want a quick shot, not when you're learning.
- P (Program): the camera picks shutter and aperture, but you can override ISO, white balance, and exposure compensation. A gentle bridge between auto and manual.
- Av / A (Aperture Priority): you set aperture, camera sets shutter speed. Best for portraits, landscapes, and learning depth of field.
- Tv / S (Shutter Priority): you set shutter speed, camera sets aperture. Best for sports, wildlife, or motion-blur effects.
- M (Manual): you control everything. Use this once aperture priority feels intuitive.
Camera Mode Quick Reference
| Mode | Symbol | What You Control | Camera Controls | Best Beginner Scenario |
|---|---|---|---|---|
| Auto | Green box / camera icon | Framing only | Everything else | Snapshots, unfamiliar gear |
| Program | P | ISO, WB, exposure comp | Shutter + aperture | Walking around, varied scenes |
| Aperture Priority | Av / A | Aperture, ISO, WB | Shutter speed | Portraits, landscapes, learning DOF |
| Shutter Priority | Tv / S | Shutter, ISO, WB | Aperture | Sports, motion blur, wildlife |
| Manual | M | Everything | Nothing (unless Auto ISO on) | Studio, tricky light, full creative control |
Symbol labels vary slightly between Canon (Av/Tv), Nikon (A/S), Sony (A/S), and Fujifilm (A/S or dedicated dials).
Tip — Suggested Learning Progression > Start in Auto or Program to build framing instincts → graduate to Aperture Priority to learn depth of field → move to Shutter Priority for motion → finish in Manual once the triangle feels intuitive. This is a progression, not a race. Most photographers I know still spend 70% of their time in Aperture Priority.
White Balance: Getting Colors Right In-Camera
White balance is how your camera neutralizes the color cast of different light sources — fluorescent bulbs lean green, tungsten lamps lean orange, overcast skies lean blue.
- Auto White Balance (AWB): reliable in most situations. Solid default for beginners.
- Manual presets (Daylight, Cloudy, Shade, Tungsten, Fluorescent, Flash): give predictable, consistent results when the lighting doesn't change.
- Custom / Kelvin: advanced; you dial in the exact color temperature.
If you shoot in RAW (covered in the editing section), you can adjust white balance freely in post without quality loss. That's why most working photographers don't sweat WB in-camera.
Your 30-Day Beginner Photography Starter Roadmap
!Visual infographic timeline of a 30-day beginner photography learning roadmap divided into four weekly phases
How do you learn photography step by step? Follow a structured 4-week starter plan:
- Week 1 — Exposure triangle: master shutter, aperture, ISO through daily comparative shooting.
- Week 2 — Composition: apply one composition rule per day.
- Week 3 — Light and subjects: shoot the same subject in different lighting conditions.
- Week 4 — Edit, reflect, share: process your best 10 frames and gather feedback.
30-Day Beginner Photography Starter Roadmap
| Week | Focus Area | Daily Practice | Goal by Week End |
|---|---|---|---|
| Week 1 | Exposure triangle | Shoot the same subject in different modes; vary one variable per day | Recognize how each setting changes the image |
| Week 2 | Composition | Apply one composition rule per day; review and compare | Compose deliberately instead of by accident |
| Week 3 | Light and subjects | Shoot in golden hour, overcast, and indoor light; pick one subject type | See how light direction and quality change mood |
| Week 4 | Edit and reflect | Cull best 10 shots; apply basic edits; compare Week 1 vs Week 4 | Recognize your own progress; build a sharing habit |
Tip — This Is a Starter Map, Not a Finish Line > Thirty days builds foundational habits and vocabulary, not professional competency. Your pace will vary based on how much time you put in, your prior visual arts background, and how often you review your own work. The goal is consistent progress, not perfection.
Week 1: Master the Exposure Triangle
- Pick a stationary subject (a coffee cup, a plant, a chair). Shoot it three ways: prioritize aperture, then shutter, then ISO.
- Review the images side by side on a screen, not the camera's LCD. The difference is the lesson.
- Keep a shot log in your phone's notes: subject, mode, settings used, what worked, what didn't. This builds the connection between technical choices and visual outcomes faster than reading.
Week 2: Deliberate Composition Practice
- Monday: rule of thirds. Tuesday: leading lines. Wednesday: framing. Thursday: negative space. Friday: symmetry. Weekend: combine.
- Shoot at least 20 frames per session. Quantity builds intuition.
- Use the composition checklist from earlier as your pre-shutter mental check.
Week 3: Light and Subject Exploration
!Three-panel comparison photo showing the same portrait subject lit from the front, the side, and from behind
- Shoot the same subject in three lighting conditions: midday harsh sun, golden hour, and indoor artificial light. Compare them.
- Pay attention to direction — front light flattens, side light reveals texture, backlight creates mood.
- Pick one subject category for the week: portraits, still life, street, or nature. Constraints accelerate learning.
Week 4: Edit, Reflect, and Share
- Select your 10 best frames from weeks 1–3.
- Edit them using the 6-step workflow in the next section.
- Compare your Day 1 photos to your Day 28 photos. This reflection is what separates people who improve from people who plateau.
- Post your single best image to a critique-focused community (r/photocritique is honest) and ask: "What's the first thing your eye goes to, and why?"
10 Practice Exercises to Build Your Skills Fast
Want a deep dive on this? These exercises are the ones I assign every beginner I mentor. They're concrete, measurable, and work on any camera you own.
✅ 10 Beginner Photography Exercises
- Shoot the same subject at three different apertures (f/2.8, f/8, f/16) and compare depth of field.
- Photograph a moving subject at three shutter speeds (1/30s, 1/250s, 1/1000s) to observe freeze vs blur.
- Shoot one scene in all five camera modes (Auto, P, Av, Tv, M) and compare the results.
- Apply only the rule of thirds for an entire 30-minute walk — nothing else.
- Shoot 20 frames using only leading lines as your composition device.
- Photograph the same window-lit subject at three times of day: morning, noon, late afternoon.
- Take a portrait with a wide aperture (f/1.8–f/2.8) focused precisely on the eyes — verify focus at 100% zoom.
- Create a minimalist image using one subject and maximum negative space.
- Shoot a 5-frame storytelling sequence of a single event (cooking, a walk, morning coffee).
- Edit the same RAW photo three different ways and choose which feels truest to what you saw.
Tip — Use a Shot Log > Record the settings for each exercise image, even just in your phone's notes app. Reviewing settings alongside results is how the technical and creative sides of photography stop feeling separate. After 100 logged frames, you'll start guessing your settings before checking the camera — and you'll be right.
Photo Editing Basics: From Raw Capture to Polished Image
!Before and after photo editing comparison showing an unedited raw capture on the left and the finished edited image on the right
What are the basic photo editing steps?
- Import and cull — keep only your best frames.
- Crop and straighten.
- Adjust exposure and contrast.
- Correct white balance.
- Adjust color (saturation, vibrance, hue).
- Apply subtle clarity, texture, and sharpening.
- Export at the right size and format.
Editing isn't about "fixing" bad photos. It's about finishing the image — bringing what you saw in your head closer to what's on the screen.
Photo Editing Software Options for Beginners
| Software | Platform | Cost | Best For | Learning Curve |
|---|---|---|---|---|
| Adobe Lightroom | Mac, Windows, iOS, Android | Subscription (Photography Plan tier, ~$10–$20/mo, varies by region; prices subject to change) | Industry-standard catalog + edit workflow | Moderate |
| Capture One | Mac, Windows | Subscription or perpetual license; pricing varies | Tethered shooting, color grading | Steeper |
| Darktable | Mac, Windows, Linux | Free, open-source | Lightroom alternative with no subscription | Moderate–Steep |
| Snapseed | iOS, Android | Free | Mobile editing on the go | Easy |
| Apple Photos | Mac, iOS | Included with device | Beginners in the Apple ecosystem | Easy |
Pricing is approximate at time of writing and varies by region and promotional offers. Verify current pricing on each vendor's site.
Tip — RAW vs JPEG: Which Should You Shoot? > RAW files retain all the sensor data — full color range, full exposure latitude, full white balance flexibility. JPEGs are processed and compressed in-camera, ready to share but with much less editing room. If your camera supports it, shoot RAW+JPEG simultaneously. You get a ready-to-share file plus an editable original. Storage is cheap; missed edits aren't.
A Simple 6-Step Editing Workflow
- Import and cull — pull everything in, then ruthlessly select your best frames. Aim for a 10:1 reject ratio.
- Crop and straighten — fix horizons; tighten composition where you should've gotten closer.
- Adjust exposure and contrast — use the histogram (the graph showing tonal distribution) as your guide. Your screen brightness lies; the histogram doesn't. Adobe's photography basics has a clear primer on reading histograms.
- Correct white balance — neutralize unwanted color casts using the temperature and tint sliders.
- Enhance clarity, texture, and sharpness — subtle only. Over-sharpening screams "amateur edit."
- Export — choose the right format and resolution for your destination (long edge ~2048px for web/social, full resolution for print).
Do You Need to Edit Every Photo?
No. Many well-exposed, well-composed images need only a crop and a small contrast nudge. Editing is a refinement tool, not a corrective crutch. As your in-camera technique improves, your average edit time per image drops dramatically. The photos I spend longest editing are usually the ones I shot worst.
How to Keep Improving: Building Your Eye Over Time
You've learned the triangle. You've shot for 30 days. Now what? Here's how to keep improving for the long haul:
- Study one photographer per week — analyze their work, don't just scroll past it.
- Shoot consistently — once a week minimum, even if it's just 20 frames on a walk.
- Seek targeted feedback — ask specific questions, not "what do you think?"
- Limit yourself constantly — one lens, one location, one subject. Constraints force creativity.
- Review your archives quarterly — your best images from three months ago will teach you what your style actually is.
- Print your work — printed photos look different than screens, and they reveal flaws you'd miss.
Tip — Build a Visual Library > Spend 10–15 minutes a week studying one photographer's portfolio in depth. Don't passively scroll. Ask: where's the light coming from? What's the composition doing? What's the color palette? Why did this image make me stop? This trains your eye as meaningfully as picking up the camera.
Study Other Photographers
- Pick one photographer per week and look at their full body of work, not just their greatest hits.
- Analyze the specifics: light direction, color temperature, subject choice, framing tendencies, recurring themes.
- Starting points to explore (examples, not a definitive canon): Ansel Adams for landscape and tonal control, Sebastião Salgado for documentary depth, Vivian Maier for street observation, Annie Leibovitz for portraiture. MasterClass has accessible breakdowns of composition technique drawn from working photographers.
- Discovery platforms: Flickr (still surprisingly active for serious work), 500px, Behance, Magnum Photos archives, and yes, curated Instagram accounts.
Get Feedback and Join a Community
- Share regularly. Local camera clubs, Reddit's r/photocritique, Flickr groups, photography Discords, in-person meetups.
- Ask specific questions: "What's the first thing your eye lands on?" or "Does the crop work, or should I have included more on the left?" You'll get useful answers.
- Apply one piece of feedback per shoot. Trying to fix everything at once just confuses your process.
- Keep a monthly "best 5" folder. Reviewing it quarterly shows you the progress that daily shooting hides. PetaPixel's learning hub has a strong roundup of community resources worth bookmarking.
Frequently Asked Questions About Photography for Beginners
How long does it take to learn photography? Learning pace varies widely based on practice frequency and the skill level you're aiming for. Most beginners develop a solid grasp of the exposure triangle and composition fundamentals within one to three months of consistent, near-daily shooting. Building a refined personal style typically takes years. Think of it as a continuous practice, not a destination.
What is the best camera for a beginner? There's no single best beginner camera — the right choice depends on your budget, intended subjects, and how much gear you'll actually carry. An entry-level mirrorless body, an entry-level DSLR, or a modern flagship smartphone are all capable starting points. Prioritize easy access to manual controls and a lens ecosystem you can grow into over brand allegiance.
Can I learn photography with just a smartphone? Yes. Modern smartphones support manual controls through native or third-party apps, shoot in RAW format, and produce excellent results across most lighting conditions. They're legitimate tools for learning composition, light, and editing. The main trade-offs are sensor physics (low-light limits, true optical zoom) and the tactile feedback that comes from dedicated camera controls.
What should I learn first in photography? Start with the exposure triangle. Understanding how shutter speed, aperture, and ISO interact is the single most important foundation, and it unlocks every other technical concept. Once you can control exposure deliberately, add composition rules — the rule of thirds, leading lines, framing. Lighting, editing, and genre-specific techniques all build on those two pillars.
Do I need to learn photo editing to be a good photographer? Editing is a valuable skill that extends what's possible from a single frame, but it's not a substitute for strong in-camera technique. Many photographers produce outstanding work with minimal post-processing. Learning the basics — cropping, exposure, white balance, color correction — is highly recommended, but your camera technique should come first.
What is the exposure triangle in photography? The exposure triangle is the three camera settings that together control how much light reaches the sensor: shutter speed (how long the shutter stays open), aperture (the size of the lens opening), and ISO (the sensor's sensitivity to light). Adjusting one setting affects the others, so balancing them is the core skill of manual photography.
How can I practice photography every day without running out of ideas? Use a structured prompt system. Assign one composition rule or technical constraint per day, explore a single subject from multiple angles, or follow a monthly photography challenge. The 30-day starter roadmap in this guide gives you a daily framework. Subject variety matters less than the consistency of showing up with the camera.
Should I shoot in RAW or JPEG as a beginner? If your camera supports it, shoot RAW+JPEG simultaneously. JPEG files are ready to share instantly and let you see results quickly; RAW files retain all sensor data for full editing flexibility later. As your editing skills grow, you'll lean more on the RAW file and use JPEG only for quick previews.
Sources
- Photography Basics — Photography Life
- Photography Basics — Adobe Creative Cloud
- Understanding the Exposure Triangle — B&H Photo
- Photography Learning Center — DPReview
- How to Learn Photography — PetaPixel
- Understanding Exposure — Nikon USA
- Introduction to Photography for Beginners — Sony
- Photography Composition Techniques — MasterClass